Hi all!
I am giving away a full Nail Art Society Accent with Attitude kit - JUST because I love you guys! :) This kit will include 1 full size Mint Nail Polish, a bag of gold nail studs, 3 Hex nail charms, AND a bonus set of nail art tweezers!
Here are some of the looks I created with my Accent with Attitude kit, just to give you an idea. :)
Rules:
You must be 18 or have a parent's permission to enter.
US Only, unless you have a US friend willing to receive the package for you.
NO CHEATING!!! I will be checking!
a Rafflecopter giveaway
Thursday, December 5, 2013
Wednesday, December 4, 2013
Colores de Carol - Blueberry Mango Sorbet and Inner Princess
Hi lovelies! Slowly but surely working through the posts in my vault!
Today I have some beauties from Colores de Carol. I was so excited to hear that Carolina started making polishes a while back. I absolutely loved her blog, so I had to try her creations - I wasn't disappointed! :)
First up is Blueberry Mango Sorbet! This one...it was love at first sight. It just reminds me of summer and ice cream. :) This is 2 easy coats topped with HK Girl.
Next, we have Inner Princess. This one is so soft and feminine! It's a white crelly base full of pastel mint stars and various glitters in purple, blue, pink, and red (those are the ones I can easily pick out). This is 2 generous coats topped with HK Girl.
What do you think of these two? Which is your favorite?? Do you own any polishes from Colores de Carol? Which ones need to go on my wishlist? I'd love to hear below! :)
<3
Kelly
Sunday, December 1, 2013
Orly - Sparkling Garbage
Hi everyone! Hope you are recovering from Thanksgiving and Black Friday and having a nice relaxing Sunday. I will be doing a lot of traveling today going back to Dayton from visiting family - I'll be glad to get back to my kitties and settle in before starting another work week :p
Anyway, I found a quick swatch post I forgot to share from quite a while back. When it first came out, I got Orly's Sparkling Garbage and tried it out on a sunny day!
This is 2 coats of Sparkling Garbage over black. Such a stunning polish! :)
<3
Kelly
Thursday, November 28, 2013
Happy Thanksgiving!!
Hi everyone!! I'm alive!! First of all, I want to say Happy Thanksgiving (if you celebrate it)! I hope you all get to spend time with family and friends and eat way too much. :)
Second of all - I want to apologize for my disappearance. Work has been kicking my butt and by the time I get home in the evenings, I usually cannot find it in me to muster up the energy to edit and put photos up. :( But, I am getting better and getting more used to my schedule so I should be back to normal soon!
I wanted to share this awesome polish with you. I actually wore this when my boyfriend and I went to see Catching Fire last weekend, but as soon as I put it on, I knew it was a perfect Thanksgiving mani as well! This is one of the new textured polishes from L'oreal, and it is called I Like it Chunky. Haha! I lol'd at the name in the store, but it was so pretty I had to get it. Check it out!
I'm not sure what makes this polish feel so perfect for Thanksgiving...I think it might be that the color kind of reminds me of sweet potatoes haha! Here's another shot.
So, quick story - I actually didn't know these were textured polishes until I swatched them lol! I'm sure it said on the display, but I wasn't paying attention. Once I did one coat, I got a fun surprise when I saw that this dried like a Liquid Sand. So anyway, since I had this smooth, shiny image in my mind for this polish, I had to make it happen! I used one coat of Gelous and one coat of Seche Vite for the following photos.
How gorgeous is this?! I loved it textured, but I think with topcoat, it's just so much more vibrant...and you can pick up on all the sparkle so much better. What a stunning polish! This is definitely a unique color in my collection, I can't think of anything even close to it. Here's one more shot with topcoat!
I'd love to hear your thoughts on this polish!! Would you wear this for Thanksgiving??
Again, I want to wish you all a wonderful holiday! Enjoy family time and yummy food :)
<3
Kelly
Second of all - I want to apologize for my disappearance. Work has been kicking my butt and by the time I get home in the evenings, I usually cannot find it in me to muster up the energy to edit and put photos up. :( But, I am getting better and getting more used to my schedule so I should be back to normal soon!
I wanted to share this awesome polish with you. I actually wore this when my boyfriend and I went to see Catching Fire last weekend, but as soon as I put it on, I knew it was a perfect Thanksgiving mani as well! This is one of the new textured polishes from L'oreal, and it is called I Like it Chunky. Haha! I lol'd at the name in the store, but it was so pretty I had to get it. Check it out!
I'm not sure what makes this polish feel so perfect for Thanksgiving...I think it might be that the color kind of reminds me of sweet potatoes haha! Here's another shot.
How gorgeous is this?! I loved it textured, but I think with topcoat, it's just so much more vibrant...and you can pick up on all the sparkle so much better. What a stunning polish! This is definitely a unique color in my collection, I can't think of anything even close to it. Here's one more shot with topcoat!
I'd love to hear your thoughts on this polish!! Would you wear this for Thanksgiving??
Again, I want to wish you all a wonderful holiday! Enjoy family time and yummy food :)
<3
Kelly
Thursday, October 31, 2013
Nail Challenge Collaborative: Happy Halloween!
Sorry for the super late post, but since Halloween is my absolute favorite day of the year, I wanted to spend it doing whatever I wanted! Mostly I just watched scary movies and played video games and enjoyed the spooky weather! :)
But, I did want to share with you a couple of Halloween nail designs I did. :)
This first one just kinda came to me when I picked up a couple of the China Glaze Halloween polishes. On my index and pinky is China Glaze Bump in the Night, and on my middle and ring is Sally Hansen Sugar Coat in Candy Corn. I topped the accent nail off with China Glaze Boo-gie Down. I loved this mani and I wore it for over a week with just minimal tip wear, like you see in the photo. I took the photos probably about day 6.
I also did a vampire-themed mani for Halloween!
The grey is OPI Skull and Glossbones, the nude is Wet n Wild Private Viewing over white, the red on my ring finger is Sinful Ruby Ruby, and on my index finger is Ruby Ruby over a dark brick red/almost brown unnamed polish I've had for years. I used my Stripe Rite striper in black for the hair and details on the vampire.
I hope you all had a wonderful Halloween! PS I'm combining two Inlinkz in the bottom of the post here - check out all the awesome Halloween nail art from the other ladies in the group!
<3 Kelly
Wednesday, October 23, 2013
Jindie Nails: Fall and Halloween polishes!
I cannot tell you how excited I was to get some Jindies back in (on?) my hands! It's been a while since I've bought any! I've been doing pretty good with my no/low-buy because I know I need another Helmer and I'm trying so hard to stop myself before I run completely out of room. Weird, I know. I feel like 2 Helmers is fine but 3 is a problem lol!
Anyway, I'm going to start off today with a Jindie Nails polish that doesn't quite fit in with the post title - it's not a Fall or a Halloween polish. Jen was kind enough to send this beauty along with my order. It's a Limited Edition that releases some time this week - stay tuned to her FB for more details! World, meet
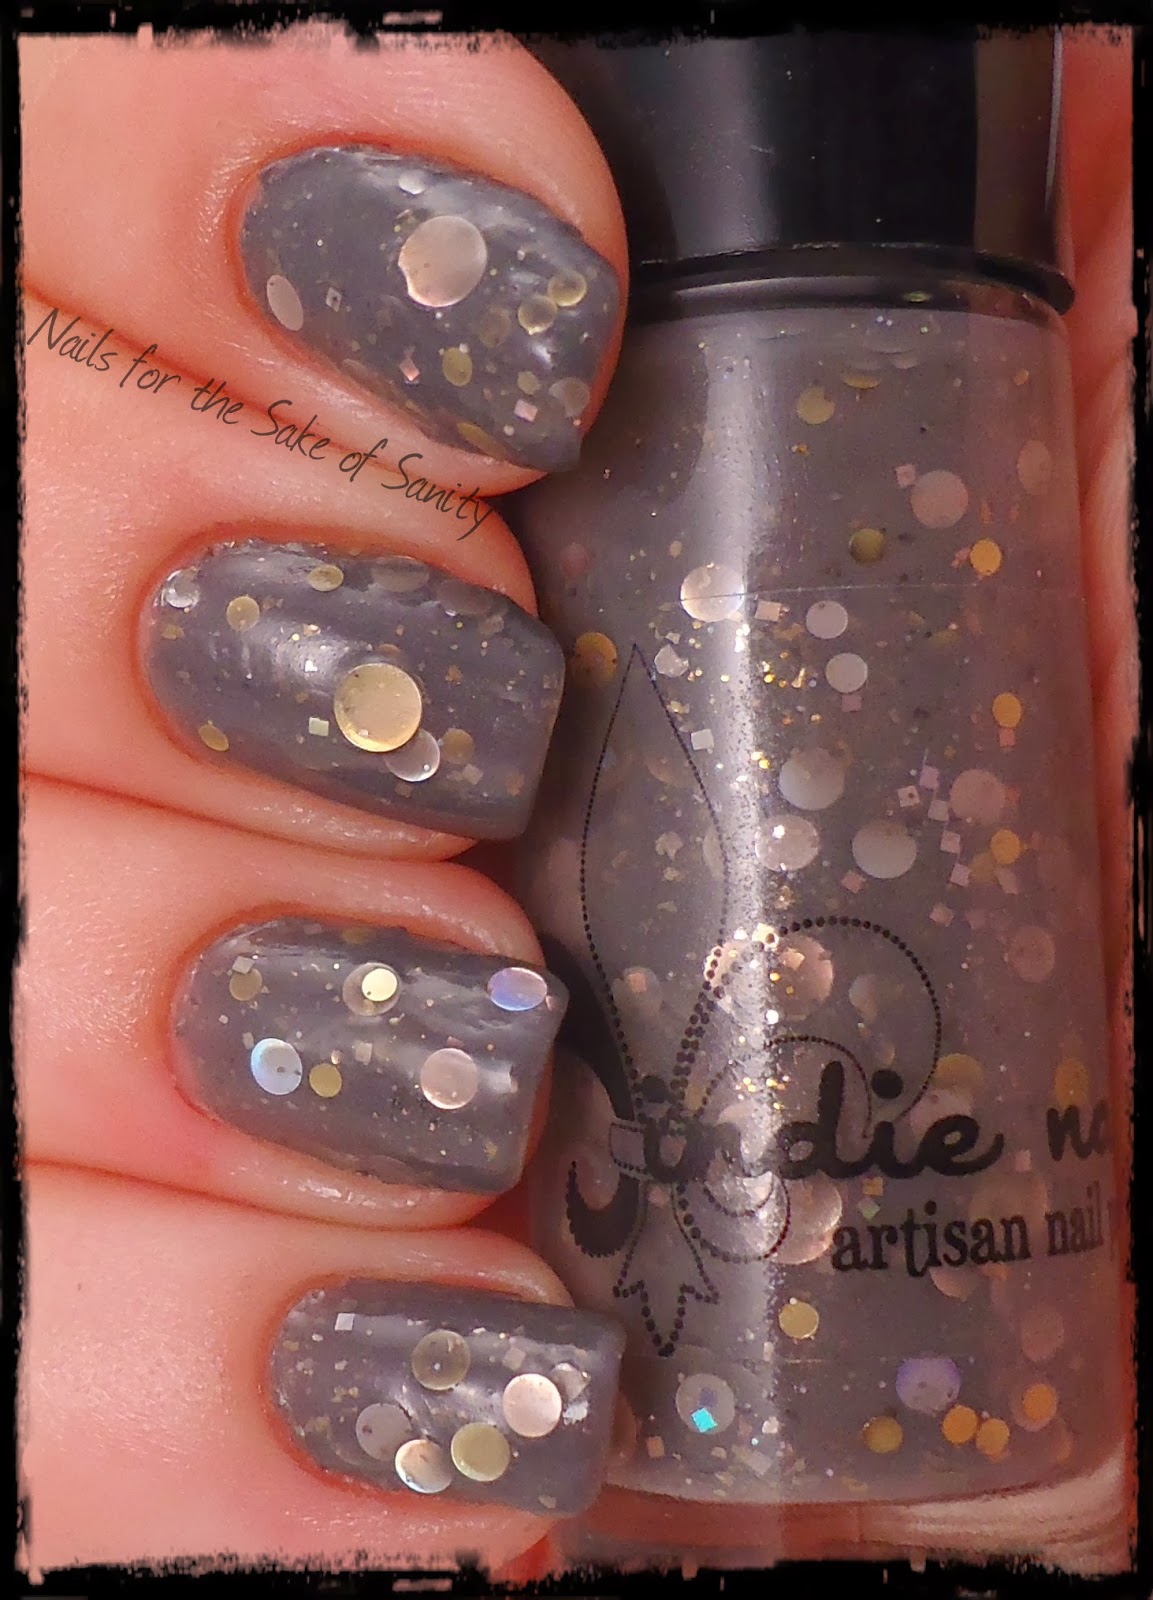
 Clearly Blinded! :)
Clearly Blinded features too many glitters for me to name! Jen says it's basically She Blinded Me With Science in a clear base, a request from a customer that Jen was able to bring to life! :) I see dots, diamonds, squares, translucent neon hexes, and rectangles. The translucent neon hexes remind me of Candy Land and Candy Land Remix! :)
Next up, we're getting into the polishes I have from the Fall Chic collection. First, we have What Are you Smokin' Mirrors. It's a lovely grey crelly base full of dots in gold and silver. It built up nicely in 3 thin coats. It reminds me of a full moon on Halloween night. :)
Another beauty from the Fall Chic collex is Midnight Rainbow. I think this is one of my all-time favorite Jindies!! It's simply stunning. Midnight Rainbow is a shimmery black jelly base full of dots large and small, in every color of the rainbow! If you look closer, there are also multi-colored flakies in the base. This is 3 thin coats. I did a bit of hand-placing with the bigger dots, just using the polish brush, to spread them out evenly.
Next up we have Electric Grape. This is not a new polish (though it has been reformulated), so I'm not sure exactly which collection it goes along with, but I think it makes a fantastic base for Halloween nail art and glitter combos, so I'm just gonna leave it here. :) Electric Grape is an eye-popping neon purple jelly that dries almost semi-matte. It has a really cool finish! There's also a lovely blue shimmer to it that really comes out in the sun - you can't see it as well in my photos as you could in person, because it was overcast. :(
Now, I mentioned Electric Grape would be great for Halloween manis? Check out this next polish, Be-Wear the Polish, using Electric Grape as undies! :)
Be-Wear the Polish is a clear based glitter topper full of glitters in greens, gray, black, and purples. There are stars, moons, dots, dashes, hexes, diamonds and squares! Such a fun polish, and I love the look of it over Electric Grape. :)
Next up are my two picks from the Halloween 2013 collex! First, we have Pink Punkin. This one has a orange sherbet-y crelly base full of pink glitters in hexes and squares.
Next is Ghosts of Candy Corn Past. I just love this name!! It's an off-white crelly base with black, orange, and yellow glitters in hexes, squares, and dots. It looks like candy corn floating around in milk! This is 3 coats alone. I would probably recommend layering this over white, because it's so packed full of glitter, it can get stuck on itself!
Last but not least - Monster's Ink! I missed the release of this one, but it is awesome so I am SO happy Jen sent it along! It's got a sort of celery-green crelly base and...another one with too many glitters to name! Stars, dots, squares, hexes, diamonds, in pink, teal, green and purple.
Which is your favorite of these? I'm torn between Midnight Rainbow and Monster's Ink! Great formulas and wonderfully unique color combinations as always! :)
Check out Jindie Nails at the following links:
Jindie Nails website
Jindie Nails on Facebook
Jindie Nails on Twitter
Jindie Nails on Instagram
Thanks for looking!
<3 Kelly
Some of these products were provided to me in exchange for my honest review and opinion. I am not being compensated for this post. Please see my Disclosure Statement for more information.
Monday, October 21, 2013
Nail Challenge Collaborative: Halloween #2
Hi guys! 2 posts in 2 days, I know - crazy, right?! I am really trying to get back into the swing of things, promise!
Today I have a Halloween themed mani for the NCC that just sort of popped into my head as I was creating it. I knew I wanted to use some new Sinful Colors I got, and this mani just kinda happened!
My index and pinky are 2-3 coats (can't remember!) of Sinful Colors Black Magic. This is such a pretty Halloween shade. It can be layered or built up to opacity in about 3 coats. On my other nails, I started with 2 coats of Sinful Colors Citrine, one of my all-time favorite oranges! For the tips, I used Sinful Colors as well, I want to say Amethyst? Then I used my Orly Instant Artist in black to add some diagonal lines, and a chevron on the thumb. The finishing touch was adding some square studs I got from Born Pretty Store. I just pressed them gently into a small dot of topcoat.
I'd love to hear your thoughts on this mani! My middle two fingers ended up reminding me a bit of a Pokeball haha. Totally wasn't intentional, but I don't mind it :) Thanks for looking everyone, and be sure to check out the other ladies Halloween manis!
<3 Kelly
Sunday, October 20, 2013
Whimsical Nail Polish by Pam - Wicked
Hey everyone! Quick swatch post for you tonight. I am sorry for my unexpected hiatus- work has been kicking my butt. I don't really have a good excuse, lol - just haven't had time for editing.
Last winter, I bought my first Whimsies - among them was Wicked. I waited to try it until Halloween because I think it is just the perfect Halloween polish! Check it out :)
That's it for tonight! Hope you like this polish :) I LOVE the squishy jelly look of it!
<3 Kelly
Last winter, I bought my first Whimsies - among them was Wicked. I waited to try it until Halloween because I think it is just the perfect Halloween polish! Check it out :)
For these swatches, I used 2 coats of Wicked over Sally Hansen Limestone and topped with Seche Vite topcoat.
That's it for tonight! Hope you like this polish :) I LOVE the squishy jelly look of it!
<3 Kelly
Saturday, October 12, 2013
Nail Art Society: I Love Studs!
Hey everyone! This month's Nail Art Society kit features one of my favorite things in nail art - studs! This month's kit was curated by the amazingly talented Emily of Very Emily!
The monthly Nail Art Society kits retail for $11.95 per month. If you subscribe to Nail Art Society by the 15th of this month, you will receive the I Love Studs kit, which includes: a bottle of Jessica polish in Black Matte, 2mm neon orange studs, 2mm pink studs, 2mm purple studs, and 3mm gold studs.
I used a similar polish, Jessica polish in Black Lustre (the same polish included in the kit, but shiny) and all the neon studs to create my first look. I'll be showing another look in a few days, using the matte polish and the gold studs!
These Jessica polishes are really great, almost one coaters for me! I used 2 coats to cover up any patchiness and applied Seche Vite topcoat. Then, I added the studs while topcoat was still tacky. There are many ways to pick up studs such as wax pencils, picker uppers, tweezers, or you could use my proven method - I lick the tip of my finger and touch it to the stud! I know, I'm weird - but it works. If you need more accurate placement, though, I definitely recommend the picker upper from It's So Easy - you can get it at Sally's. I chose to topcoat over the studs to make them last longer, and it worked - this mani lasted a couple days before the urge to pick off the studs was just too great and I gave in haha! Some of the color came off of my studs, too, after a couple days - but it wasn't very noticeable.
What do you think of this look?? It reminds me of the dot candy from when I was little! I'd love to hear your thoughts below! If you're interested in subscribing in Nail Art Society, you can check it out here. And don't forget to check out the other Renowned Artists' looks created with this kit. :)
<3 Kelly
Monday, October 7, 2013
Nail Art Society: Foil & Decal Kit
Happy Monday everyone! Back to work this morning - it's still only my second week at this job, so I'm still really excited about it lol! Today I have to share with you this month's Nail Art Society kit. For those of you that don't know, Nail Art Society is an awesome monthly subscription that you can get for $11.95 per month. Each month, you will receive a selection of nail polish and nail art supplies hand selected by Renowned Artists (like me!). We are truly committed to making sure customers are receiving the best value for their money, as well as nail art items that are on trend, useful and versatile. I strongly recommend checking it out! :)
This month's polish was sent by Jessica. It's a gorgeous shade from their fall collection called Cinnamon Kiss. You will also receive 2 sets of Cala nail decals, one pot of gold foil, one pot of silver foil, and 2 packages of rhinestones (not pictured).
My first thought was to try nail art looks using ONLY what came in the kit. Here's what I came up with!
The polish is a wonderfully vampy shade that's perfect for Fall. It was perfection in 2 coats - no complaints here! The decals were super simple to apply - just peel and stick. I added topcoat over them to be sure they didn't fall off, and I had no problems. The foil is a bit trickier. It's very, very fragile - it's lighter than you might think! You have to be very careful handling it or it will rip. For that reason, I think the easiest way to use it is to shred it and use it as a flaky overlay. If you are very careful, though, you can smooth it flat on top of wet topcoat. I recommend topcoating over it as well, or else it will flake off. For the last photo above, on the silver nails, I laid down the foil flat on top of wet topcoat, and then while it was still wet, I stretched it around a bit and it made a cool crackle effect. :)
I also wanted to try the two foils over some other colors of polish. This is the gold foil over Revlon Topaz.
And this is the silver foil over Sinful Shine in Slick.
So what do you think of these looks? Have you worked with foil before - any tips? Which is your favorite look created above! I'd love to hear below. <3
Don't forget, if you'd like to receive this kit, you still have until the 15th to subscribe and get this one. And, this month only - when you enter the code "Shemar" you will receive 10% off. Shemar Moore, who plays Derek Morgan on Criminal Minds, is a friend of one of our founders, and Tia has created this discount for any of his fans who sign up this month! How awesome is that?! :)
Nail Art Society website
Nail Art Society on Facebook
Nail Art Society on Twitter
Nail Art Society on Instagram
Thanks for reading!
<3 Kelly
Saturday, October 5, 2013
Guest post at Sassy Paints!
Good morning everyone! Happy Sassy Saturday!
Today I have a guest post up at Sassy Paints - head over there to check it out by clicking here! <3
Subscribe to:
Posts (Atom)


