Thursday, May 30, 2013

Model City Polish 1 Year Holobration! Swatches + Giveaway!

Hello all! I'm SO excited it is finally the day I can share the news with you! Today marks the 1 year anniversary of the Model City Polish Etsy shop, and I have got a wonderful surprise for you. In honor of this milestone Nina is celebrating, several bloggers and I are "Holobrating" in a very special way. Nina has created a custom, limited edition polish to honor her supporters, and it is called Holobration! Bottles of this polish are numbered, and very limited.
First, I want to say that I have had nothing but positive experiences with Model City Polish, and I am thrilled to be celebrating this milestone with her. Her polishes are wonderfully creative, beautiful, and reasonably priced - plus she's just a super sweet person who makes each customer feel special. :)

Oh, forgot to mention before - there will also be a restock today. Here are the times, for all the different timezones:
8:00 PM EST
7:00 PM CST 
6:00 PM MST
5:00 PM PST
Don't miss it, there are some absolutely fabulous summer colors coming out, 3 of which I will be showing you this week! If you miss out on the polish you want, don't worry too much - Nina plans to work her butt off to restock what sells out, by next weekend!!
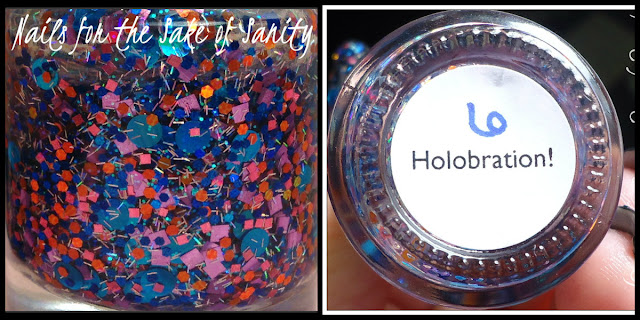
Now, I've got some swatches of Holobration for you, over two different bases to show the versatility of this polish. So without further ado, check out the photos of the amazing Holobration - but don't stop there...be sure to read all the way to the bottom for a chance to WIN your very own bottle!!


Everyone, meet Holobration. It's a clear base packed full of large blue dots, orange hexes, pink and purple squares, and tiny silver holo micro bars.


Here's Holobration intentionally blurred to show the holographic rainbows in it!


First, I knew I had to layer this polish over black. I knew all the different colors and the large blue dots would really pop over a dark color! This is 2 coats of Holobration over Milani Black Swift. 2 coats of Seche Vite for topcoat. Let me save time here by saying the formula is great, especially for how packed it is with glitter. The large blue dots come out all on their own without a problem, but I found I preferred to drag them around and place them where I wanted them instead of leaving it random. The teeny little bars were NO problem at all, no sticking up, no curling whatsoever. Get ready for a lot of pics - this polish deserves them all!


 Then I wanted to try something brighter, more reminiscent of a celebration! I chose Milani La Vie En Rose for the base this time! Same deal, 2 coats of Holobration followed by 2 coats of SV. I think I actually prefer the pink base! So summery and fun. :)


And now for the part you've been waiting for - what you could win!! Nina was generous enough to send me an extra package to share with my lovely readers!

Here's a peek at the goodies inside! The package the winner will receive is the unopened one in the left top corner, so everything you get will be brand new and unused. These following pictures are of my items.

The winner will receive: 1 full size Model City Polish Holobration (very LE), an amazing hand made hair tie, and a mini glass file (perfectly purse size)!


The Rafflecopter form is below, but first, the rules:
  • You must be 18 or over to enter, or have a parent's permission.
  • All entries will be verified - NO CHEATING, or you will be immediately disqualified!!
  • Sorry international ladies, this one is US only! Unless you have someone in the US who can receive your package, international entries will not be accepted. 
  • Good luck! :)

a Rafflecopter giveaway

Tuesday, May 28, 2013

The Nail Challenge Collaborative: Stamping #4

Guys, I did it - this is my 4th and final stamping look that I created for the NCC this month - and I'm on time! This one actually turned out to be my favorite :)
Again I wanted to try something different than just stamping over a color - so this time I stamped over a glitter!

Here's what I started off with - yes, another Sinful Shine. This is my favorite polish they've released in this line. Alfresco is a gorgeous, creamy cornflower blue. I thank other bloggers for describing it that way because I'm not sure I knew what cornflower blue was!
Anyway, I added 2 coats of a polish I mixed up using Glitter Mix Boutique's Midnight Rainbow, for the accents. I love their glitter mixes!! I just bought more the other day, I can't wait to play with them!


In these photos, there is topcoat on the accent nails only. The other nails are Sinful Shine Alfresco alone! Look how shiny! ::drool::


Then, I turned to my trusty Bundle Monster plates yet again (they were the only ones I had at the time lol) and I chose a simple zebra print. Honestly, I didn't want something too detailed, because I didn't want to take away from the beauty of this base. I adore Midnight Rainbow over Alfresco!!


I stamped using Sinful Colors Black on Black, and Gosh Holographic Hero for the accents (thanks, Sharra)! It was my first time using a holo for stamping, and I just loved the subtle but beautiful rainbow it added to my accent nails.


Honestly, I was so, so happy with this mani. No, it's still not perfect stamping, but this is one that I was completely proud to wear. So many clients asked me if it was a sticker or something, which is always such a nice compliment!

What do you guys think of this mani?? Have you tried stamping over a glitter? How about holo stamping? What's been your experience? I'd love to hear below!
<3
Kelly

Monday, May 27, 2013

The Nail Challenge Collaborative: Stamping #3

Hey everyone! I've got my third stamping post ready (finally) and should have the other one up tomorrow. Not quite posting these weekly by any means, but I'm going to make it before the end of May! :)

For this one, I wanted to try something different than just stamping over a plain base. But, I almost had a hard time covering up this gorgeous pink shade from Sinful Shine. These are the new "gel-like finish" polishes from Sinful, and I had to pick up a few (okay, more than a few). Now, I'm a topcoat addict - so I thought it would be interesting to challenge myself with these polishes, since they say they're so shiny that no topcoat is needed. Did I find this to be true? See for yourself! This is 2 coats of All the Rage with NO topcoat.


Oh my goodness, I fell in love with these polishes. The formula is incredible on every one I've tried so far, and they are every bit as shiny as they are advertised to be. Normally Sinful's formulas are hit or miss for me, but this line is wonderful. Anyway, as hard as it was to cover this polish, I knew I wanted to do something more. I added Sinful Shine Come Hither and Sinful Black on Black to create a fun gradient!


And then I stamped using Sinful Snow Me White with a girly hearts and dashes pattern. It's not perfect, but I liked it all right.


My thumb was too big for the design, but I didn't realize until too late! Oh well, chalk this one up to another stamping lesson learned. It's not the worst one I've ever done lol.


What do you think of this mani? Have you ever had ideas that look so much better in your head than they do when you actually paint them on your nails?? I'd love to hear below!
<3
Kelly


Sunday, May 26, 2013

Salon Perfect Neons for Summer!

Hey guys! Super quick post for you today before I head off to work. I saw these polishes when I was at Walmart last night and had to pick them up after seeing a few bloggers post the press release. I think they're awesome and pretty affordable at $3.98 each, so I recommend you check them out!


From left to right, this is Jolt, Bang, Shocked, and Kaboom. From reading the press releases, I guess there was one more called Zapped, but I either didn't see it or I thought it was too similar to Kaboom to warrant getting it. I personally don't own Floam, but I think Kaboom might be a pretty close dupe for it. All of these have a really cool, Floam-like texture and the color mixtures are perfectly bright for summer! I tried each of the ones I bought on a swatch wheel.


The above shows two generous coats of each polish with no topcoat. They feel kinda gritty without topcoat, which I like, but some people may not. They're not quite as textured as the OPI Liquid Sands or the Zoya Pixie Dusts, though.

What do you think of these? Will you be picking any of them up? Which is your favorite? I'd love to hear :)

<3 Kelly

Saturday, May 25, 2013

The Nail Challenge Collaborative: Stamping #2

Hey everyone! Here is my second stamping mani! Sorry these are so late. I've had them done but have been too lazy to write up the post lol. This one I wanted to look a little elegant. I started off with OPI DS Magic, which is absolutely gorgeous.


This polish has an amazing shimmer in it that my camera kinda refused to capture. You can see it in the bottle though. This was my first DS I've ever tried. I love it, but I'm not sure it's worth the $12 price tag. 


I stamped using my Bundle Monster plates and Zoya Trixie. I looked for a whimsical, kind of flowy design and this is what I came up with!


So what do you think of this mani? I think it makes a great combo! Let me know your thoughts below! <3
Kelly

Wednesday, May 22, 2013

The Nail Challenge Collaborative: Stamping #1

Hello loves! I am slowly but surely catching up with my NCC manis. I've had all my manis done for a while but just haven't had time to sit down and edit!
Anyway, for my first stamping mani, I started with the amazing Zoya Storm. I snapped a few shots of it by itself, because it's so pretty, it needs to be shown on its own!


Then, I was feeling inspired by the name of my base polish, as well as the weather at the time, so I decided to stamp on some lightning bolts! I used Sally Hansen Lightening for the yellow, and my Bundle Monster plates (not sure on the number sorry)! I think it turned out really cool.


I know my stamping is still not perfect, but I see improvements every time I try. One of my friends pointed out that this looks like Harry Potter, which I didn't think of at the time but I don't hate. I love Harry Potter!

So what do you think of this mani?? I'm starting to get really into stamping as I get better and I feel like there's so many options - it's exciting! :) I'd love to hear your thoughts on how this one turned out. <3

Kelly

Monday, May 20, 2013

Nail Art Society: May's Kit - Kiss-N-Tell (pic heavy)

Hello everyone! Happy Monday :) 
Today I am so excited to share the May's Nail Art Society kit with you. This month came SO packed full of goodies, I couldn't even believe it. 
Here's a look at everything that's included in this month's Kiss-N-Tell kit:


I didn't get these cards included in my box, but Tia of NAS was kind enough to send me copies. This month's card featured some gorgeous looks done by Emily of The Lacquerologist that you can use for inspiration. 
And here are some of the looks I created using this month's kit. This is a simple skittle I did using the Kiss 3D Charms. For the base, I used Pure Ice French Love Affair, which was one of a few wonderful gifts I got from Tia!! She is truly amazing with customer service.


Next up, you will see my first EVER experience with nail strips!! I was so excited to try these. I have a few but have never tried them because I usually just stick to painting my nails. I found these to be surprisingly easy to use, even for a newbie like me! Check out Kiss Nail Dress in Corset.


First, what you do is try to choose a nail strip that is close to the size of your nail bed. Then, you stick it on, at which point, it looks like this lol:


Fold it over the edge of your nail, use the file provided in the kit to file off the excess, and you should get something like this!


I got SO many compliments when I wore these strips!! I had to explain countless times that I did not paint these, haha! Not to mention, these are so bright neon, it's unreal. Perfect for summer. I did have a bit of a snafu with the ring finger, I filed too much at an angle and ended up with a blank spot at the tip, but no one noticed!


After such a good experience with Corset, I was even MORE excited for Teddy! This sort of look is more my style.


Again, here's step 1. This time I decided to put them all on at the same time, and then file them all at the same time. Plus, I thought they looked kinda cool before I filed them - like super long talons.


Post file! Since these strips have gems on them that actually stick up, you have to use the blue/black side of the file, but I had no issues filing off excess. They came right off at the ends and looked wonderful!


I adore both of these sets of strips. I will definitely buy more Kiss Nail Dress in the future - it took maybe ten minutes to do the entire mani, and the best part? No remover needed when you're ready to change them - just peel them right off! :)


Next up are the Nail Artist Flat Stickers. These are very pretty - a mixture of flowers and swirlies.


I wanted to use a bright, fun, summery color as a base for this mani, so I pulled out Rimmel Mintilicious. It's really more blue than green, it reminds me quite a bit of CG For Audrey. Then, I layered flowers, and swirls for a whimsical floral look.


I had a bit of a problem with my pinky being too small to fit what I tried to fit on there, but that was my fault. I should have known to choose smaller stickers for my tiny pinky lol! I covered these with 2 coats of Seche Vite, and though the gems made it feel textured still, it was not distracting at all.


I would definitely use these again to add a quick bit of bling to any mani! I also feel like they are very versatile - there's lots you can do with them! :)


Lastly, this was the product I was most excited about - The Kiss Marbleizing pen & polish. I already knew not to expect the results shown on the front of the box from reading Emily Lacquerologist's review, but for some reason, I still felt like maybe I could do it haha!


Anyone who has done a water marble or a needle marble knows that the above picture cannot happen, but I wanted to try and have fun and play with it anyway. I painted most nails with the medium purple, and my two accent nails with the darkest shade. Then I tried doing dots and swirls with the different colors, and using the needle/pen tip to make swirls and patterns. Your best bet is to just ignore the thought of a water marbled look, and figure out something else.


I did end up really liking the look I came up with! The swirls of different colors reminded me of seashells or mother of pearl. So, while I was somewhat disappointed about the packaging being misleading, I ultimately really liked what this product CAN do.


Phew! That was a lot of talking/pictures...if you made it this far, I commend you!
Overall, I think this month's kit was the best value so far. At $9.95 a month, for all this, I was a very happy girl. I didn't actually go through and add up what everything is worth retail, but I do know that the Kiss Nail Strips are close to the price of the box for just one set. I highly, highly recommend subscribing to Nail Art Society - you will not regret it!!

I'd love to hear what you think about the looks I created! Which are your favorites/least favorites? Will you be subscribing?

<3 Kelly