Friday, August 15, 2014

Cult Cosmetics: Festival Lights Blackbox

*Press sample*
Hey everyone! I have yet another amazing Blackbox from Cult Cosmetics to share with you today! As you may know, I am a sponsored artist with Cult and I was sent 3 amazing boxes to try - this is the final one! :)

Here's some information about the BlackBox, Cult's monthly subscription box, from the Cult website: 
"Introducing BLACKBOX by CULT. With BLACKBOX, every month you’ll receive the latest nail colors and looks... along with tips, tools and occasional bonuses every month. We never test on animals, we ship fast, and because we don’t spend millions a month on TV ads, we can give you a better quality product at only a fraction of the cost."
The August Blackbox was just released, and it looks amazing! You can view it here, and you can receive 50% off your first box with the code BLACKBOX.

Today, I'll be showing you the Festival Lights Blackbox, which includes the following:

- Laguna by Cult, inspired on the beautiful city of Laguna Beach 

- Breakwater by Cult, local surf spot in Venice, CA. 

- Coachella by Cult, Holographic top coat. 

- Set of 3 brushes


Here are the 3 brushes included with this box. The 2 angled brushes are absolutely perfect for cleanup!! I wanted to try the fan brush because I had never used one before. So, I looked up some techniques for how to use a fan brush and that's how I came up with the mani I did! :)


I used two coats of Laguna on my index and middle finger and two coats of Breakwater on my ring and pinky. I used the fan brush dipped in just a bit of the opposite color and ran it across the nail horizontally a few times on the index and pinky nails. Then, I added just one coat of Coachella on the middle two nails. One coat of HK Girl topcoat and done!


Coachella is really a gorgeous holographic topcoat! It would look amazing over any color. I can't wait to try it over black or another dark color! And, I really loved the fan brush technique. I think it would be fun to try with several colors instead of just two. This is a great, versatile kit. I did use the smaller angled brush for cleaning up the polish around the edges of the nail and it worked really well! I already know I'll be using that one a lot.

Cult Blackboxes retail for 19.99 per month + s/h,but new members receive 50% off your first box using the code BLACKBOX! Also don't forget to check out Cult's polishes a la carte as well as their nail art kits !
Check out Cult Cosmetics on Facebook and Instagram as well to stay up to date on new products and kits.

What do you think of this look? I'd love to hear below! <3

Kelly

Tuesday, August 12, 2014

Bonita: Witches Ball collection

Hey everyone!! Today I have a collection I am SUPER excited to share with you for a variety of reasons - Bonita Witches Ball collection! Here are the reasons: one, this is the first Halloween collection I've seen out this year. Two, the colors are gorgeous. And three, I FINALLY learned how to do the curved watermark!! More on that later. :)
I walked away from this collection twice when I went to Rite Aid for other things, because I was trying to be good! But, who was I kidding? I went back and got it like three days later because I couldn't stop thinking about it. Halloween is my absolute favorite holiday, and these polishes were so pretty - I couldn't resist!

Now, about this curved watermark. I have been wanting to do this forever, but could never figure it out. A few days ago, I finally caved and asked for help from an amazing IGer named Emily (@BlueEmster) and she managed to do the impossible and help me master the curved watermark!!! I also kinda/sorta used the tutorial posted by Kayla Shevonne, but she used a different version of GIMP so some things were different and I kinda had to wing it (and ask Emily for help). I honestly cannot thank her enough - I never thought I'd be able to do this but I finally got the hang of it. :)

Anyway, onto the swatches (with the curved watermarks!) okay, I'll stop, haha.


These are in no particular order. First of all, I want to do a blanket statement here and say that all (with the except of one) of these polishes had wonderful formulas! They are super smooth, opaque, and the shimmer in these is unreal! In all of these photos (except one, which I'll note) I'm wearing 2 coats of polish with no topcoat.

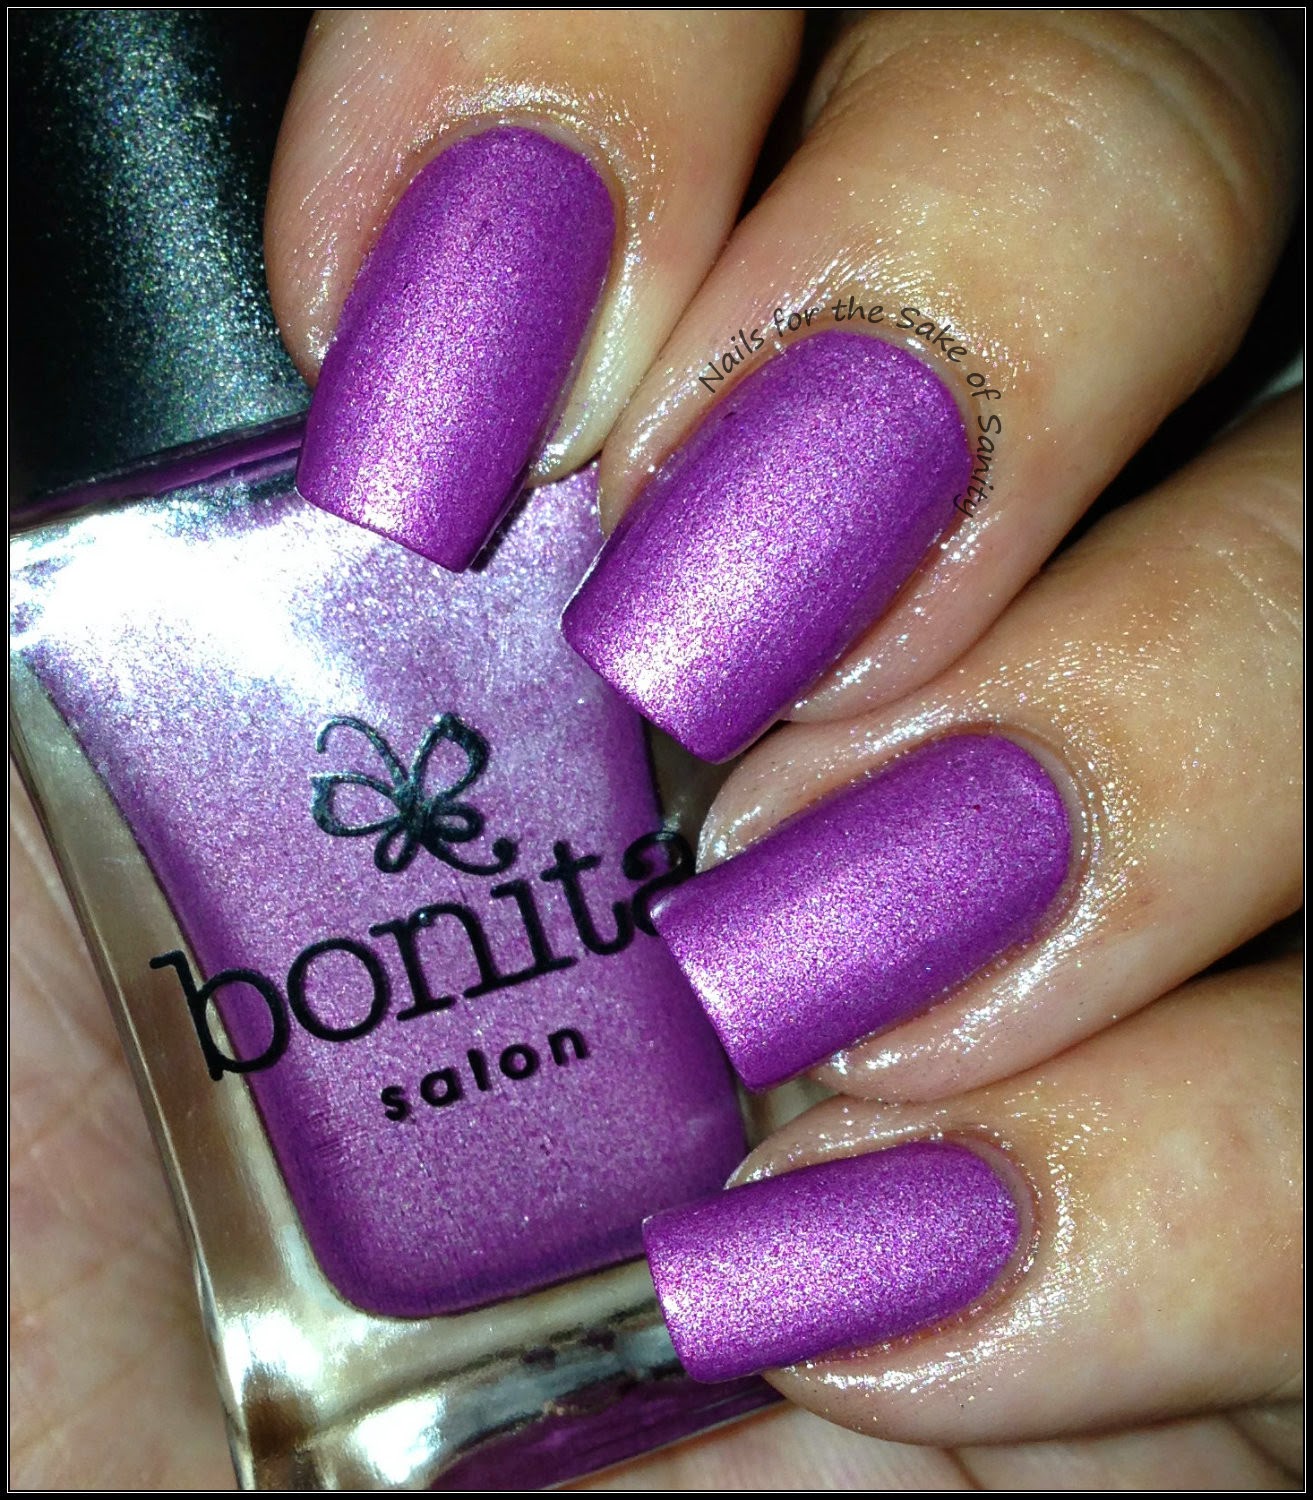
First up is Lacquer Treats - it's a pink-leaning lavender shimmer. Dry time was really fast! This one could have been a one-coater, but I did 2 out of habit. These photos were taken in the lightbox.


Here's a shot with flash, to really show off the shimmer! Such a pretty purple.


Next up is Wicked Good Time. This is a pale, super reflective, silvery metallic green - almost a foil! It has such a great chrome finish. This one was the closest to a one-coater but I did 2 anyway.
These first few photos were taken in the lightbox.


And of course, a shot with flash!


Next is Too Cute to Spook, a reddish/fuschia with strong purpleish shimmer. It reminds me of a candy apple! This one does need 2 coats as it's a bit less pigmented, but it was flawless by the second coat - no VNL at all.
These first few photos were taken in the lightbox.


This one's a bit more color accurate with the flash. It's more berry colored than the lightbox shows.


Get ready for my hands down favorite of the collection - Cocktails & Carving! It's a perfect creamy pumpkin orange with a stunning golden shimmer! 2 coats, no topcoat.
These were taken in the lightbox.


These few were taken in indirect natural sunlight. The natural light really shows this color most accurately - I never wanted to take this off!


Here's a shot with flash - check out that shimmer! It almost looks like a scattered holo with the flash on :)


Eat, Drink and Be Scary is a dark navy with silver shimmer that reminds me of dark, spooky Halloween nights and starry skies!
These first two photos were taken in the lightbox.


These two were taken in indirect natural sunlight. This color is screaming for some Halloween night nail art, I think! Maybe some tombstones! :)


Lastly, we have Dying to Party - this is the only polish in the entire collection I even had the slightest trouble with, and it was very minimal! That's a successful collection to me! This one was a bit less pigmented, so I needed 3 coats for full opacity. It was also a bit thicker than the other polishes, so I ended up with some unevenness at first, but only because I chose not to use topcoat for these swatches. A coat of Seche Vite or HK Girl would have solved that problem in a snap! And anyway, you can't really see any problem areas in the photos below - once the mani dried, it went away.
Anyway, Dying to Party is a stunning off-white/grey with a strong silver/grey shimmer.
These first photos are in the lightbox.


These next few were taken in natural lighting. This color is so stunning in person. It really reminds me of ghosts! I can't wait to do some nail art with this! :)


I really love how this photo with flash shows off the grey shimmer. This polish is really unique, I really don't have anything quite like it in my collection!


My must-haves for this collection are Cocktails & Carving, and Dying to Party, but it's a great well-rounded collection. I honestly can't wait to use it for some Halloween/fall-themed nail art, and with how pigmented the polishes are, I bet they're going to be great for stamping - especially Wicked Good Time. I will be sure to share as soon as I give it a try!

Be sure to check out Bonita Colors website or stop by your local Rite Aid to see all the colors they offer, and make sure you are following them on Facebook, Twitter, and Instagram to keep up to date on all the latest colors and collections!

I'd love to hear your thoughts on this collection - which is your favorite? Have you tried any of these shades? I'd love to hear below!

Thanks for reading <3
Kelly

Monday, August 11, 2014

Daily Lacquer Earth Kingdom over Zoya Bevin

Hi all! Today I have a simple but fun look to share with you. A few months ago, I had just started a new job, and I did a simple dotticure on my swatching hand (which I'll be posting soon), and I wanted to come up with something simple to match it on my Cinderella hand. Nothing too crazy, because I still wasn't sure what the new job's policy was on nail polish (turns out, they don't care - yay for me!). 
So anyway, I chose a base that went with the color family of my dotticure, and chose a glitter that worked perfectly with it! This is Zoya Bevin topped with Daily Lacquer Earth Kingdom!


I had been waiting for an opportunity to use Earth Kingdom and I felt like this was the perfect chance! It complements Bevin really well. Maggy is not currently making Daily Lacquer anymore due to the potential harm the chemicals could do to the wonderful BABY BOY she is growing in her belly! But, I hope she will return to making polishes later on, because she is truly talented. In the meantime, click the link above to check out Daily Lovelies, where Maggy sells her beautiful eye shadows and other makeup products! 


My favorite part of this look was the amazing micro shimmer in Earth Kingdom. It was very visible in certain lights - this mani was very eye-catching. Actually, this and the dotticure I wore were the first manis that made my new coworkers take notice. One even asked me several times if I got my nails done somewhere - she didn't believe at first that I do them myself! :) I love those compliments!
Here's an angled shot where the shimmer really shows itself.


What do you think of this combination? I think Bevin is a really gorgeous color, and I think it is versatile, it can go really well with a lot of glitter toppers or accent colors. Also, Earth Kingdom is a stunning glitter mix, I love the combination of colors and the shimmer!
I'd love to hear your thoughts below :)

Kelly

Saturday, August 9, 2014

Toothless nails

So, those of you that have been following me for a while may know that I have a cat named Trixie that I'm head over heels in love with. I got her when I first moved to Dayton, didn't know anyone and was feeling exceptionally lonely. And I originally went to the PetSmart to adopt a different cat, but when I held him, he just sat there like a bump on a log. Then I saw his cage-mate running around through poop and bullying the other kittens. The store clerk said, "That one's a trouble maker." I said well, let me just hold her, just to see. And the second I picked her up, she started mega-purring, rubbing her face on me and let's just say my decision was made.

Please bear with me for some Trixie spam - I promise this relates back to the post, haha.


The first time I watched How to Train Your Dragon (yes, the cartoon), I cried so hard it was absurd. For a while, I couldn't figure out why, until I realized that Toothless, the main dragon, reminded me SO much of my cat Trixie! I love the movie and recently saw the second one, and I got inspired to do a Toothless nail art!

I mostly used these two photos for inspiration:


And now...the mani I created!


This mani didn't turn out as good as I'd hoped, but I still really love it. I was hoping for a stronger contrast of the scales against the black, but it turned out pretty subtle. And, it was hard to fit his whole head on one finger lol! This was a tough one. But I definitely wanted to incorporate his little pirate flag tail, and I like how that turned out! I used mostly Sinful Colors: Snow Me White, Black on Black, and a red Sinful striper. I used China Glaze Stone Cold for the scales and a combination of Sally Hansen Limestone and Wet n Wild Fergie in Glowstick for the eyes. Seche Vite topcoat. :)


So, did you stick with me the whole time?? I know, this was a wordier post than normal and included some NPR stuff...but isn't my baby adorable?! When she lays down and looks at me upside down, she has two vampire fangs that poke out and she looks so much like Toothless! And, she even leaves her tongue sticking out sometimes which is just too cute.
Anyway, I hope you liked the mani - I'd love to hear your thoughts below! :)

<3
Kelly