Saturday, January 25, 2014

Nail Challenge Collaborative: Inspired by A Tutorial #3 (Owls)

Hey everyone! Hope you're having a great weekend. I've been catching up on some swatching and working on a look for Nail Art Society, so check back soon for that. :)
Today, I have another mani inspired by a Chalkboard Nails tutorial. This time, it's Valentine's Owls!

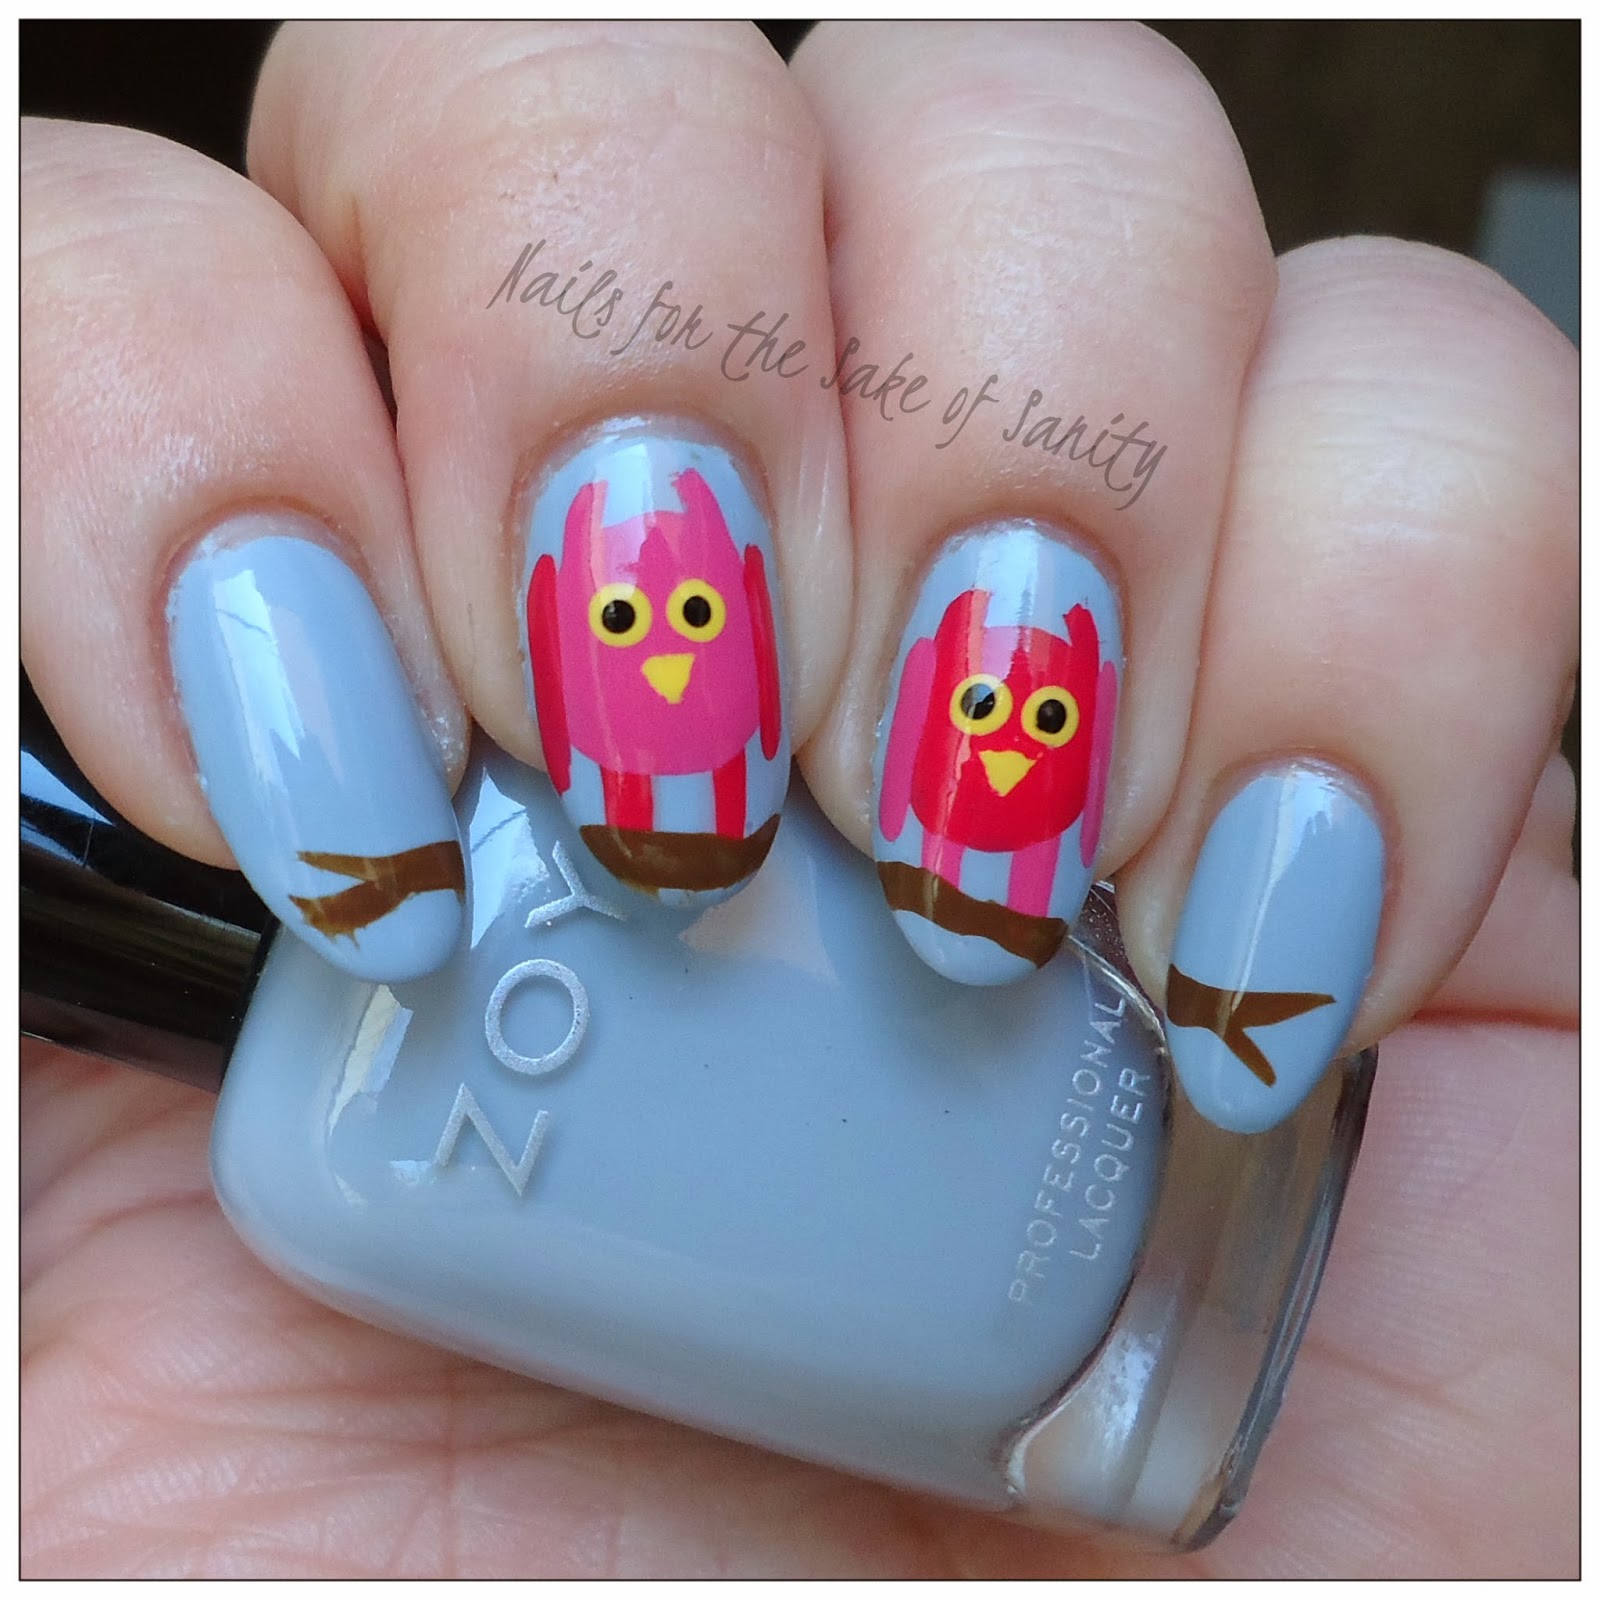
And here are mine:


I used Zoya Kristen for the base. It's such a soft, pretty color. I got it during their recent sale! After that, I used Sally Hansen Presto Pink and Speedy Sunburst for the owl bodies, legs and wings, Sally Hansen Lightening for the eyes and beak, and China Glaze Mahogany Magic for the branch. Topped off with Seche Vite topcoat!


These adorable owls were super easy to recreate using Sarah's tutorial! I opted not to put the hearts on their bellies because I realized too late that I didn't leave enough room, but I thought they were cute anyway. What do you think? I'd love to hear below! <3

Kelly

Wednesday, January 22, 2014

Latest post EVER - Daily Lacquer Slayer Collex: Part 2

Wow! So, going through my old drafts folder, I found this post...photos all ready to go of the Daily Lacquer Slayer collection...from APRIL of last year haha!! I can't believe I never published it. Unfortunately, I waited so long that these polishes are no longer for sale, but they are too beautiful to go un-shared. Besides, you can add them to your lemming list in case they ever pop up in a blog sale or Maggy starts making polish again.

As you may have guessed, this collection was inspired by Buffy the Vampire Slayer - one of my absolute favorite shows! I had to have the whole collection. Here is Part 1 of my review in case you missed it last year. ;)

First up today, is Giles the Ripper. It's a stunning purple shade with a strong multicolored shimmer, mostly blue, but sometimes reddish or goldish!


I would be lying if I said I remembered exactly how many coats this was, but I would guess 3 coats. I remember absolutely no issues with application.


Next up is Not So Angel. It's a ghostly white with blue shimmer. This one took three coats to cover up my stained nails, but it was worth it! SO pretty.


I hate how my stupid thumbnail curves when it gets long. Must need some more of some vitamin!


Last is my second favorite of the whole collection (second to Wicca Willow). Slayer Comma The! It's a pretty peachy coral shimmer that can look so different in any given lighting and angle. I love how multidimensional it is. A very soft, feminine shade but with an edge!


So, what do you think - aren't these just GORGEOUS?! I am so sorry I waited so long to post them! I sincerely hope that Maggy starts making polish again one day, because they are all truly unique and beautiful. However, in the meantime, she is now making eye shadow - you should check out her site! If I knew anything about makeup and how to apply it, I would definitely purchase from her lol. Click here to go to the Daily Lovelies site. Thanks for looking!

Kelly

Tuesday, January 21, 2014

Nail Challenge Collaborative: Inspired by a Tutorial #2 (Bows)

Hey guys! Today's mani was inspired by the amazing Alice over at One Nail to Rule Them All. Seriously, if you're ever short on inspiration, just check out her blog - she's so creative! She's got some great tutorials as well. I loved her cartoony bows, so that's the tutorial I chose to use for today's look.


I did a slightly different color for my bows, and I didn't have Shimmer Kim, so I used Bernice. I started with 3 thin coats of Bernice and then painted the bows in China Glaze Four Leaf Clover. I topcoated over the bows to try to prevent the dots from yellowing but as you can see, it didn't really work. :/ I'm not sure why that happened! It seemed like the when I dotted on the white over the green, it pulled up some of the yellow out of the green. Then, I outlined using my Stripe Rite brush in black, and Seche Vite. Honestly, I forgot the little wrinkles in the bow until afterwards, but I still like them!


These were really fun and super easy to create. I opted to use Yellow Stopper base coat underneath, so I could easily pop off this glitter later on. Otherwise, it would have been a nightmare to remove! I really liked how these turned out. I might try this again, using Shimmer Kim and adding pink or orange bows. It's really a versatile look that can work in a lot of different colors - I love it. Thanks Alice for the great tutorial!!
What do you guys think of this look? I'd love to hear below <3

Kelly

Monday, January 20, 2014

Nail Challenge Collaborative: Inspired by a Tutorial #1 (Sheep!)

Hi everyone! I hope you are all enjoying your day off, if you get one. This is the first year I've been allowed to take off all major holidays, and I am certainly making the most of it. :)
Today, I have my first post for the Nail Challenge Collaborative's "Inspired by a Tutorial" month. There are tons of tutorials I've been meaning to try out, so it was really hard to narrow one down. But, the first one I knew I wanted to do was this adorable sheep tutorial I saw on Chalkboard Nails

And, here's my take!

I used Zoya Josie for the grassy background, Sinful Snow Me White and Black on Black for the bodies and legs, Sinful Smokin for the ears, and Sally Hansen Presto Pink for the noses. Topped off with Seche Vite and done!


I thought these sheep were SO adorable, and I didn't want to take them off to do the next mani! What do you think?

Kelly

Wednesday, January 15, 2014

Lynnderella: Bed of Nails over ManGlaze ILF

Hi everyone! Hope you're having a lovely Wednesday! Mine's been crap, but I'm distracting myself by doing my nails so I figured I'd put a post up tonight as well!
Right around my birthday, I decided to treat myself to some Lynnderellas. I picked out three, and I am showing you my favorite of the three today - Bed of Nails!

I started off with 2 coats of ManGlaze ILF, a lovely turquoise blue matte/suede. I picked up this one during their Black Friday/Cyber Monday sale. 


Then I grabbed my Lynnderella - Bed of Nails! It's easier to just show you a photo than to try to name all the different kinds of glitter in this one.


Not only do I love the colors of glitter and the adorable little skull glitters, but Bed of Nails has stunning micro-flakies, giving it an awesome shimmer! Check it out. This is 2 coats over ILF.


I'm definitely happy with this purchase! I had to do a bit of fishing to get the larger glitters out, but that's to be expected. What do you think of this one? What are your favorite Lynns? I'd love to hear! <3

Kelly

Tuesday, January 14, 2014

Lucky 13 Lacquer: Butterfly Project

Good morning lovelies! I have a long overdue swatch post for you today. This is one of the tons of beauties created by Kyoti Jess of Lucky 13 Lacquer, but this one is special. I could paraphrase, but Jess does a way better job of explaining what this polish is really about, and she very bravely shares her own story. Click here to read about The Butterfly Project. The important thing you need to know is that this is a charity polish, and it is for a very, very great cause. This is the first polish I think I've seen that is called a Pay What You Can polish (you can pay anywhere between $2-$20). I paid the recommended $10 for it, but those who pay more, offset the cost of those who can't afford much - how wonderful is that?! Even better, if you ask her to, Jess will make up a cute and whimsical name, just for your polish! My butterfly is Lady Buttercup <3


Butterfly Project is a gorgeous purple creme base with rainbow colored glitters and holographic butterflies!


There is nothing I don't love about this polish. Right now to the adorable stickers on the bottle, this is perfection in every way! I used three coats for the swatches below and topped with Seche Vite. Everything felt completely smooth, even the butterflies.


What can I say, I am in LOVE with this polish and the idea behind it. I already loved Lucky 13, but this just confirmed it. I definitely think if you or someone you know has ever struggled with self-harm, this is the perfect little treasure. It can be used as an alternative - paint your nails with little butterflies instead! I absolutely adore the idea - sometimes, that's all it takes is something little to take your mind off whatever it is that you are going through. You can pick up Butterfly Project here, and Jess has informed me that this is going to be part of her permanent line - which I am so glad to hear!
And, be sure to check out the rest of the Lucky 13 line - they are awesome and many are inspired by nerdy things - what could be better!?

I'd love to hear your thoughts on this one! Let me know below <3
Kelly

Sunday, January 12, 2014

Hare Polish: Reverie in Rubellite and Heat Plague

Hi loves! Quick swatch post for you tonight. I'm making my way through the mountain of photos in the vault!

These were my first 2 Hare Polish purchases, Reverie in Rubellite and Heat Plague. First up is Reverie in Rubellite. These swatches were from back in the fall when I had nubs! :)


I knew I was going to love this one because orange is my favorite color and pink (especially dark pink) is a close second. It looked like it was on fire when the sun hit it - so pretty!


Next up is Heat Plague. I liked this one the moment I first saw swatches of it, and I love it even more in person. It's kind of a weird mix of colors that I feel like shouldn't work, but they do. This one reminds me of Halloween because of the lime green, slimey-colored based, and the purple and orange glitters. 


What do you think of these two? Which is your favorite? Do you own any Hares?? Which ones do I need to add to my little collection?! I'd love to hear below. Thanks for looking! <3

Kelly

Monday, January 6, 2014

Nail Challenge Collaborative: Inspired by Art #3 (Pointillism)

Hi loves!! I have time for a second post today, because I got called off work - YAY!!! It's horribly cold out. I dug my car out of snow and layers of ice this morning, which took about 20 minutes, then I had to stop and get gas. By the time I pulled into the parking garage at work, my face hurt so bad, my ears felt like they were falling off and my eyes wouldn't stop watering. But, literally the second I pulled into my parking spot, my phone rang. After all that, it was my supervisor telling me the agency was closed! I thought about working for a bit, since I was there anyway, but then I decided to go back home and get warm! :)

SO that was my morning. Now, for this Inspired by Art mani, again I found the idea while Googling. I did a report on Pointillism in French while I was in high school, and I really like the look of it. I found this cool heart on Google, and I knew it would look great on the nail!


Instead of exactly recreating it, I decided to try the heart on one nail and do some of the other colors of dots on the other nails. I thought it got the point across without being too hard! I started with a base of Sinful Colors - Snow Me White, and I dotted the various colors using a dotting tool. I can't even begin to remember all the colors I used, sorry! I used 3-4 polishes for each colors (i.e. 3 purples, 3 pinks, etc...). I topped it all off with Seche Vite and the surface felt completely flat.


Here's a shot I took on my phone with the flash on. I thought the flash really helped all the different shades and colors to stand out. This was a really fun look!


I wore this mani for like a week, I didn't want to take it off! I'd love to hear your thoughts below! <3

Kelly

Nail Challenge Collaborative: Inspired by Art #2 (Piet Mondrian)

Hi guys, so sorry this is so late! I promise to get caught back up for January! So, as I've said before, the NCC December's theme was Inspired By Art. I just did some googling around and looked for some genres and I found this cool art by Piet Mondrian. I thought it would make some cool nail art!


I used a base of white (Sinful - Snow Me White) and I colored in the squares from the top down using a striping brush. The red is Sinful - Gogo something...?, the blue is Mentality Ruffian (Gorgeous matte royal blue!), and the yellow is Sally Hansen Lightening. I used my It's So Easy striping brush in black for the lines. Topped with Seche Vite. (I'm out of HK Girl right now!)


I thought this type of art really translated well onto the nail. It's something different and eye-catching.
What do you think? Do you like this look? I'd love to hear below! :)

Kelly

Sunday, January 5, 2014

Nail Art Society: The Great Glitzy kit!

*Press sample*
Hi everyone! I hope you all had a Happy New Year! This month's Nail Art Society kit offered a perfectly glam look that screams New Year's, but I personally think any time is the right time for a little sparkle! So, if you missed out on this kit for New Year's, it's not too late! As long as you sign up by the 15th, you will get this kit, called The Great Glitzy - which was curated by the fabulous Lynette Cenee!

First of all, it comes in an adorable studded bag. By the way, I believe there are two versions of the kit - gold and silver. I got silver, so that's what I'll be showing. I absolutely adore this bag! It's definitely something I will use again.

And here's a look at the other items that were included in The Great Glitzy kit. A bottle of Floss Gloss in Dimepiece. This was my first experience with this brand, and I love it! A little baggie of assorted rhinestones, pearls, and rings (this photo was taken after I did my look, so there will be slightly more in the bag). And, an adorable pot of silver holographic loose glitters! I took two photos of the little jar, because I really wanted to show you guys how much glitter is in there. Seriously, I think I'm set for life. It's packed FULL. :)


I decided to try to do a sort of skittle mani, incorporating all of the different items in this kit. The black base is Jessica Black Lustre, a gorgeous opaque black creme! I did three coats of Dimepiece alone on my ring finger, and I did a little waterfall gradient over black on my pinky. For the index and middle fingers, I applied a generous coat of Gelous topcoat and handplaced the loose glitters and rhinestones using an orange stick. For the heavier rhinestones, I used a pair of nail art tweezers to pick them up. I sealed the loose silver glitter in with a thick coat of Seche Vite topcoat, creating the "disco ball" look.


I absolutely loved this mani!! The best part? I picked the rhinestones off using my orange stick and they can be used again! :) The loose glitters, not so much, but that jar has so much in it, I don't have to worry about re-using!
What do you think of this look? Is this something you would wear? I'd love to hear below! And don't forget, you can still receive this kit if you sign up by the 15th. Click here to go to the site! :)
<3
Kelly

These products were provided to me in exchange for my honest review and opinion. Some links in this post are Affiliate Links. I am a Nail Art Society Renowned Artist, but that does not affect my review of these products. Please see my Disclosure Statement for more information.