Sunday, July 27, 2014

ModCloth Nail Art: Inspired by a Dress!

Hey there loves! Hope you had a great weekend! I spent mine relaxing on Saturday and then I went to Dayton's Celtic Festival with my fiance and his parents. It was awesome! We heard some great bands, and had yummy food and cider. I don't want to go back to real life!! :(
Anyway, I have a really fun post to share with you today! I was recently contacted by ModCloth and asked to join in on a nail art challenge they are having. I was so excited to be a part of this! :)
ModCloth's Nail Klub had posted a blogpost explaining the concept - basically, take one of their dresses and translate it onto your nails. I had so much fun browsing the dresses to try to choose one to recreate. They are so many unique and gorgeous dresses - I wanted them all. While searching, I kept in mind that I have a lot of friends getting married in the near future, and I wanted to look for something I could wear to a wedding, but still wear to work or just on date night out. I wanted something girly, pretty, but versatile, so it could work in a lot of situations. Ultimately, after a lot of searching, one design kept calling to me - Promoting Elegance in Bubbles!


I knew I wanted to do this one because as soon as I saw the dress, I envisioned it on my nails! And, this dress is so very me. Here's how the nail art look turned out:


I started with a white base because the nude color I wanted to use was so sheer. But it was the closest color I had to the dress background. I then went in with three coats of Sally Hansen Bold Buff. For the dots, I used Sinful Black on Black and Cult Cosmetics Laguna, and my Born Pretty Store dotter. I used HK Girl topcoat, and stuck on the bow I got in a Nail Art Society kit while the topcoat was still wet.


I thought this turned out so cute, and I think it matches the dress really well!


Overall, I was blown away by the selection of dresses I found on ModCloth. Be sure to check out their website to see the Promoting Elegance dress I loved, as well as tons more gorgeous dresses. I loved the selection of party dresses. As I mentioned, I have a bunch of weddings coming up in this next year, and there are SO many dresses on the site that would be perfect for me for those occasions. There are also a huge selection of dresses I'd wear to work, for a girl's night out, or even just day to day. I love quirky, fun, unique designs, and ModCloth has no shortage of those! Check them out :)

I'd love to hear what you think of this mani! Can you see the inspiration from the dress in the mani?
Thanks for reading,
Kelly

Saturday, July 26, 2014

Jindie Nails swatches: Higher Flower and Patience is a Virtue

Hello everyone! Today I have swatches of two Jindie Nails polishes to share with you! 

First up is the amazing stunner Higher Flower. It's incredibly bright and the depth is gorgeous. I seriously could not stop staring at my nails when I had this on!


Here's the description from Jindie Nails shop:
"The most beautiful and highly pigmented neon pink polish, loaded with micro flakes and holographic micro glitters in purple and silver.  The flakie colors are bronze, silver, purple, pink and blue.  The silver flakies are bits of real silver.  It's divine and opaque in 1-2 coats."


Even though this polish looks like a jelly, it's very opaque. These photos show 2 coats with topcoat. :)


Next up is an unreleased polish called Patience is a Virtue. This one was created to make up for a longer than usual shipping time. I would say it made the wait well worth it! Sorry to tease you with it, but it's too pretty not to share! :)


Patience is a Virtue is a berry-pink shimmer full of glitters in shades of blue, purple, and pink. I had no trouble with formula, the glitters spread out nicely. Photos show 3 coats with topcoat.


What do you think of these polishes? You can check out Higher Flower and all of the other Jindie Nails pretties by clicking here. :)

Thanks for looking!
Kelly

Thursday, July 24, 2014

Myrtle Beach Vacation nails

Hey guys! I'm really excited to finally share this post with you! A couple weeks ago, my fiance and I traveled to Myrtle Beach with my family for vacation and I (of course) did my nails for the trip.

The first ones, and probably my favorites, were these striped palm tree nails that you may have seen me share on Instagram! :)


I tried to be artsy and get the sand in the back of these shots lol. The sun on the beach was great for picture taking! I started with a base of black, applied striping tape and painted on each color one at a time. From top to bottom, I used: Wet n Wild On a Trip, Sinful Thimbleberry, Sally Hansen Insta-Dri Dreamsicle, Sally Hansen Insta-Dri Glow With It, an unnamed Summer Brights blue, and Sinful Mint Tropics. I topcoated with Seche Vite before I freehanded palm trees using my Stripe Rite striper, then topcoated again. Phew! It was a lot of work, but worth it in the end. :)


Not a great shot of the nails because the sun was behind them, but I managed to get an ocean backdrop! :)


On my non-dominant hand, I had to do something still pretty, but nothing intricate. My left hand is useless for nail art! So, I tried a mermaid look! :)


I already had some tip wear by this point from all the digging in the sand, but this mani really held up for the most part! I started with a base of Zoya Logan and sponged a bit of Zoya Zuza around randomly on the nail. Then, I added 2 coats of Orly Mermaid Tale. I love how it sparkles!


And of course, because I truly have a polishing problem, I had to change my mani halfway through the vacation! I had seen Chalkboard Nails Starfish Mani and I wanted to try my best to recreate it!


I started with a base of Wet n Wild A Venice Day. I really like this yellow! It's a little thin but buildable. I've been looking for good yellows. I don't like this one quite as much as Sally Hansen Insta-Dri Glow With It, but it's not bad. Then, I followed Chalkboard Nails' example and painted on little starfish using China Glaze Pool Party, a dotting tool and a small nail art brush. I followed that up with some purple dots using the smallest end of my dotting tool. I used Seche Vite topcoat.


These were so much more vibrant in person! They looked great on the beach too, I wish I had gotten some photos in the sand.


I absolutely loved all my vacation nails! I felt like they were super fun for summer and I got so many compliments on them. It always feels nice when you have a group of people cluster around you in awe of your nail art haha! :)
I'd love to hear what you think of these looks? Which is your favorite? I'd love to hear below!

<3
Kelly

Saturday, July 19, 2014

Swatch: Scofflaw Nail Varnish - David Bowie's Bulge

Hi everyone, happy Saturday! I actually have to work today, so it's not all that happy for me, but to cheer myself up, I'm posting a fun, bright swatch! :)

This polish was my first experience with Scofflaw Nail Varnish. I bought this and one more polish about a year ago, and I'm so glad I did! The colors are amazing and the quality of the polish is wonderful too. Today I am showing you David Bowie's Bulge.

....the nail polish. Haha, I couldn't stop giggling when I was wearing this mani, just thinking about the funny name. Like, hey everyone, check out David Bowie's Bulge! Teehee! I'm ten.

These photos show 3 thin coats with Seche Vite topcoat.


The label had some very cool David Bowie makeup inspired art printed on it. I thought that was a really cool touch!


Here is the polish description from Scofflaw:
"This polish is a nod to the iconic Aladdin Sane album cover, with Bowie's face paint translated into a rich, deep coral polish with subtle shimmer. It's accented with matte and holographic teal glitters of various sizes and also features small dark red glitters and a bronze microglitter. It's completely opaque in two or three coats."


I wouldn't have thought of this color combination on my own, but it really does work together amazing well! The coral base is gorgeous, and the pops of teal are so bright and eye-catching. It's a really fun polish for summer, it kind of reminds me of tropical beaches for some reason.

Here's a shot with flash, a bit more color-accurate than the ones in direct sunlight above.


My first impression of Scofflaw Nail Varnish was great!! I definitely want to try more of their polishes (Arcane Sugar, I'm looking at you). Formula was absolutely perfect, I experienced no issues with clumping glitters or dragging at all. :)
Be sure to check out the Scofflaw Nail Varnish shop and Facebook page to keep up to date on restocks and new shades! They have a ridiculously amazing new collection launching on July 27th, so mark your calendars for that!

Thanks for reading,
Kelly

Friday, July 18, 2014

Review: Nail Art Society Festival Princess kit!

*Press sample*
Good morning lovelies! I have another review for you today, this time it's the Festival Princess kit from Nail Art Society!
Nail Art Society kits retail for $11.95 plus s/h. You will receive one kit per month, full of goodies hand picked and curated by a team of Renowned Artists, including myself! Along with the polishes and tools, you receive nail art tips and tricks from the Renowned Artists! I think it is a great value - worth well above the price you pay. Click here to become a subscriber and get signed up for the next kit!!

The Festival Princess kit includes a full set of NCLA Nail Wraps in Summer of Love (which retail for $16), an NCLA nail polish (I received I'm With the Band, these retail for $16), a package of gold nail studs, and an orange stick, all in adorable Nail Art Society branded packaging! I just love that little touch.


I instantly fell in love with these nail strips! The designs are so eclectic, and felt very bohemian to me, which is very much my style. 


Each package of nail wraps includes its own NCLA nail file to be used filing off the ends of your strips. I put this one in my end table after using the strips and I've been using it ever since. It really is a great little file, and I thought the pink gradient was really pretty.


I'm not the absolute best at applying nail strips to say the least haha. I can usually manage without bubbles, but I have not mastered the nail tips yet. I always end up with such obvious tip showing, I wish there was a way to wrap the tip with the nail strip...well, there probably is and I just don't know how! Anywho, I started with a coat of NCLA I'm With the Band on all nails. I applied a full nail trip to one nail and cut the others into shapes for funsies - I'd never tried that before! I like how it turned out. :)


Oh by the way, sorry about the ugly cut on my finger!! I did something to it at work, can't remember what now...but I wasn't going to let it stop me from showing my pretty mani :)


The NCLA polish was great - the formula is on point, the color is stunning. The website lists it as a coral, but I definitely saw it as a red-orange that leaned more red. I can see why these polishes retail for so much - this was a great quality polish! I used two coats for these photos. 


I really loved this kit! The value of it alone was enough to convince me, but somehow this month's selections really fit in with my personal style. I haven't used the gold studs yet, but I am sure I will soon!
You can click the links below to subscribe, check out the items in the NAS shop, or follow NAS on social media to keep up to date on new boxes and nail art looks from Renowned Artists! Thanks for reading! <3

Subscribe to Nail Art Society
Nail Art Society A La Carte Shop
My Nail Art Society Renowned Artist page
Nail Art Society Facebook
Nail Art Society Instagram
Nail Art Society Twitter

These products were provided to me in exchange for my honest review and opinion. Some links are affiliate links. I am a Renowned Nail Artist for Nail Art Society, but that does not affect my review of these products. Please see my Disclosure Statement for more information.

Thursday, July 17, 2014

Review: Cult Cosmetics Boho Chic Blackbox

*Press sample*
Hi guys! I have some very exciting news to share with you today! I was recently contacted by Cult Cosmetics about being a sponsored nail artist with them. I have to be totally honest, I wasn't terribly familiar with Cult at that point, but once I did some research and saw the products Cult has to offer, I had to say yes! 
First, I want to share some information about Cult Cosmetics with you, in case you're unfamiliar, like I was. Cult has the option of a subscription box, call the Blackbox. From the Cult website: 
"Introducing BLACKBOX by CULT. With BLACKBOX, every month you’ll receive the latest nail colors and looks... along with tips, tools and occasional bonuses every month. We never test on animals, we ship fast, and because we don’t spend millions a month on TV ads, we can give you a better quality product at only a fraction of the cost."
This month's Blackbox is called Summer Chic, and you can see it by clicking here. And it's only 9.99, because you get 50% off your first kit!

In addition to the Blackboxes, there are nail art kits that you can buy. These have lots of great tools as well as polish colors, and you are able to see what all is in each kit before purchasing. These kits vary in price but look to be a pretty good value in my opinion!
You also have the option of buying individual polishes and lip glosses a la carte on Cult's website.

Today, my review is of the BoHo Chic Blackbox. Here is what was included:

- Mulholland by CULT (0.5 oz, $12 value) , a rich chocolate brown

- Rose Bowl by CULT (0.5oz, $12 value) , a dusty rose leaning terra cotta

- Runyon by CULT (0.5 oz, $12 value) , a soft sage green

- Color Club® Black Striper Brush ($4 value)

When I saw these colors together, I immediately thought "hippie" haha. I wanted to do a nail art that embodied the feel of the box and used all the products, so I came up with this tribal design!


It was a very overcast day in Dayton, and I couldn't quite get my camera to cooperate with showing these polishes color accurately! So, I tried one with flash. It washed out my skin, but the colors are pretty accurate in this next one. :)


I started with a coat of Runyon on all nails except my accent, which I used Mulholland. I used two coats for full coverage. I then did a gradient using a makeup sponge, adding Rose Bowl to the tips. I used the black striper to freehand some tribal designs and topped it all off with HK Girl!


The formulas of these polishes were really great. They were all very pigmented, but I didn't experience any staining at all. Application was a breeze, no streaking, pulling, dragging - just very smooth. The striping brush was a little thicker than the Stripe Rite one I typically use, but it was still very easy to use and made making straight lines super easy. I even did the dots with the striper, my other one can't do that! :)

Cult Blackboxes retail for 19.99 per month + s/h, however as I mentioned, when you sign up initially, you will receive 50% off your first box! And even if you're not a subscription kind of person, I highly recommend checking out their polishes for sale as well as their nail art kits - you won't be disappointed! Check out Cult Cosmetics on Facebook and Instagram as well to stay up to date on new products and kits.

What do you think of this look? Have you ever tried any Cult Cosmetics product? I'd love to hear below!
<3 Kelly

These products were provided to me in exchange for my honest review and opinion. I am a Sponsored Nail Artist for Cult Cosmetics, but that does not affect my review of these products. Please see my Disclosure Statement for more information.

Tuesday, July 8, 2014

Review: Polishes from Emerald & Ash - Life in Color Collection!

*Press Sample*
Hi everyone - happy Tuesday! I have been trying to get this blog post up all day, but I am on vacation in Myrtle Beach and the wifi here is spotty at best. Plus, I've been at the beach and pool soaking up the sun! But I couldn't wait to get this review posted. 

I recently was given the opportunity to try some new polishes from Emerald & Ash. I have never tried their polishes, but I had heard about them and seen pictures, so I was SO excited. Even better when I found out that Ashley and Nate are former Daytonians, AND one of these upcoming polishes had a Something Corporate reference!! These guys are awesome.

Here is the amazing package I received in the mail. I love the branding on everything - there was a stamp on the box, and a clear branded business card. There was also a set of helpful instructions and tips about application and glitter removal, including some felt strips for taking the glitter off. 


My cat Trixie was a big fan of the eco-friendly packaging. She wanted to make sure it tasted okay before I got any further opening the package. :)


I saw three regular sized wrapped bottles and one small one...


...and I unwrapped full size bottles of Elevendy Seven, Zetus Lapetus and (!!!) Confusion with a K! Also, Ashley and Nate included a bottle of their cuticle oil in Fresh Cut Grass scent (Ingredients: Jojoba oil, grapeseed oil, meadowfoam seed oil, fractionated coconut oil, tea tree oil, vitamin A oil and vitamin E oil).

First, here is some information on the Life in Color collection, releasing July 10, 2014 at 9am MDT as a pre-sale. Here is some information from Emerald & Ash about the inspiration behind the Life in Color collection:
"The 14 polishes in Life in Color were created because we absolutely love color and sometimes the colors we wanted to make just didn’t fit into a collection. This was our chance to play and make things we’ve been thinking of for the past year, as well as allowing us to to play with different finishes we haven’t used before. Seeing as this was our chance to play with color, we decided to take this opportunity to give names to the polish that make us laugh while mixing in some that have personal meaning to us.
All of these polishes are highly pigmented, so as always we recommend a good base coat to wear with them."

These are the 14 shades being released - SO.MUCH.COLOR!!!!


First up, I have swatches of Elevendy Seven. Here is Emerald & Ash's description and inspiration for the polish:
"Growing up when I used to ask my mom about an amount of something, quite often the reply would be that we need “elevendy seven”. So maybe we needed elevendy seven of...eggs, or...dogs, or who knows what. It’s a term that stuck with me into adulthood and is a fitting name to go on a color that was my mom’s favorite (green, that is). A beautiful grass green stain crelly that is filled with yellow shimmer, rainbow flakies and a touch of holo. You might just want to pull your shoes off to run your feet through it. Due to the pigments used this polish will dry to a stain finish, if you like a glossy look add a top coat to it to make it shine. Depending on your application 2-3 coats will bring this polish to full coverage."


My camera had a hard time capturing the true color and shimmer of this polish, and an even harder time showing the flakies - I swear, they were SO obvious in person! I tried getting a bottle shot to show you what I mean.


So, I used my Yellow Stopper base coat, and then did 3 coats of Elevendy Seven over that, topping it off with Seche Vite. Without top coat, it had a really cool almost matte finish, but I prefer a glossy look, so I topped it off. For shorter nails and nails that aren't stained, 2 coats of polish would be plenty! Application was great. The first coat went on fairly sheer, but built up wonderfully with the second coat. It is very highly pigmented, so E&A recommend a base coat. I had zero staining on my nails or cuticles, though! :)


I also applied the Fresh Cut Grass (July scent of the month) cuticle oil before taking photos of all these polishes. I fell in love with it! The oil is highly moisturizing, but absorbs quickly and never feels greasy on the skin. And the scent is to die for - it just smells like summer - very clean and fresh! :)


I took one final shot, using flash this time, as an attempt to try to capture all the shimmer. This polish is really the perfect grass green but with so much more added to it. The blue and purple flakies make it truly unique, and the shimmer give it so much depth. 


Next up is Zetus Lapetus! From Emerald & Ash:
"A lipstick pink shimmer that just screams wear me! We felt that wasn’t enough so we tossed in some bright blue micro flakies and a smattering of holo. Sassy, fun and reminiscent of our favorite, always up to something, girl of the 21st century. Depending on your application 2-3 coats bring this polish to full coverage."


This polish is extremely bright and in your face - I love it! And, when I was younger, I was obsessed with the Zenon movie - the first one haha, I wasn't a fan of any that came after that. So, I was happy to see a polish inspired by the movie, and such a great summer shade too! I definitely think "sassy" was the perfect word to describe this one.


Again, I used 3 coats, but someone with shorter or less stained nails could easily get away with 2. I used Yellow Stopper base coat and Seche Vite topcoat. I applied some Fresh Cut Grass cuticle oil and rubbed in before taking photos. The shimmer in Zetus Lapetus was super strong too - and I love the holo sparkles!


I took another shot with flash to show off the micro flakies and the scattered holo. I love the bright berry colored tone of this one! :)


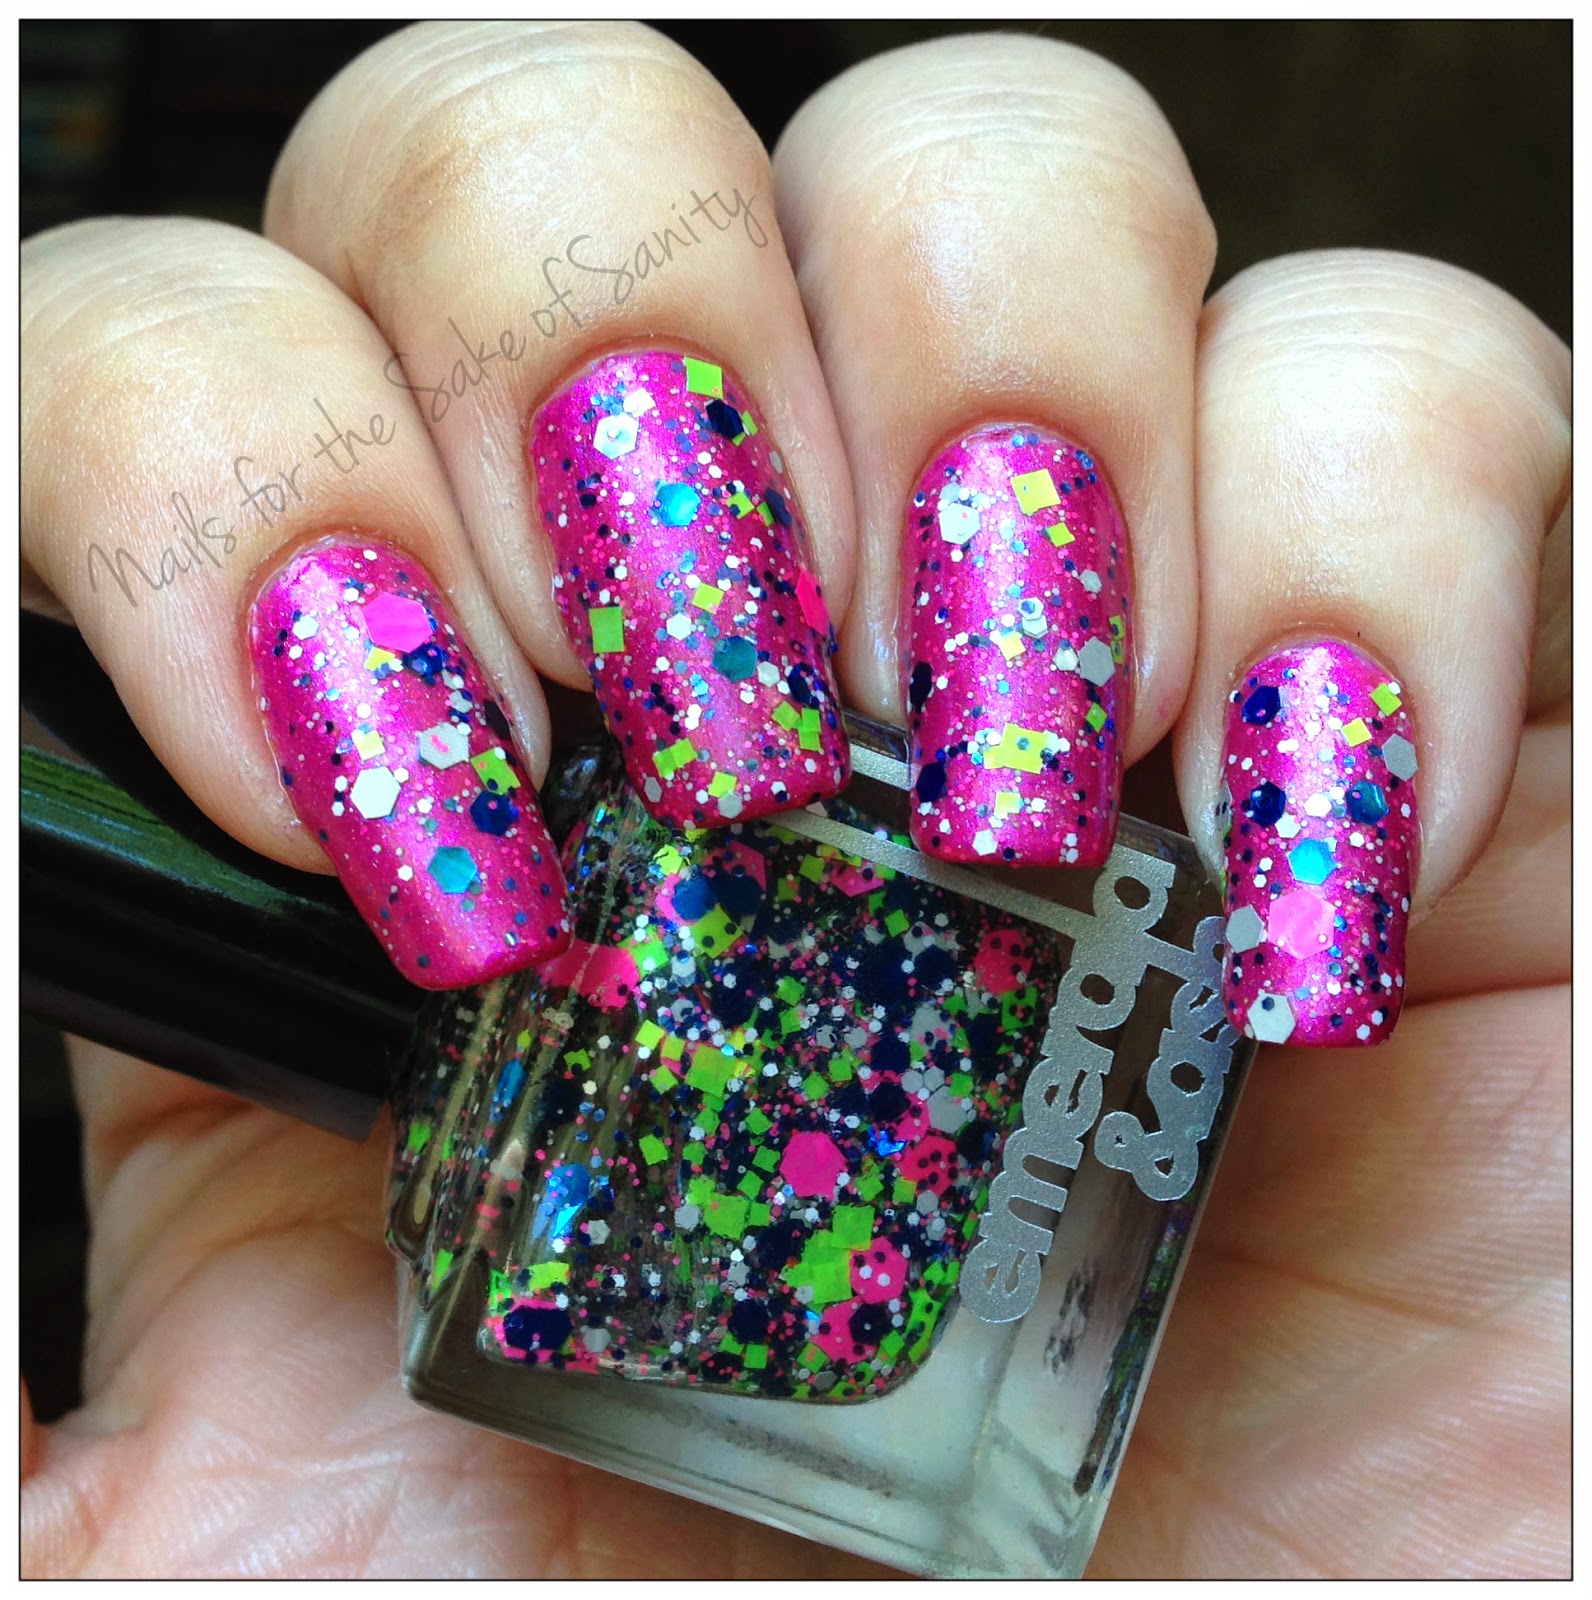
Last, and probably my favorite of the group - though it's hard to decide - is Confusion with a K! I could be biased because I adore the Something Corporate song that it is named after...but anyway, description and inspiration from Emerald & Ash:
"Once upon a time we found an ottoman that had beautiful bright colors and it needed to come home with us. It also needed to be made into a polish. After many trials and errors it decided to be a fun, festive glitter topper. Because it said so. And so, Confusion with a K was born. A glitter topper full of neon pink, neon green, metallic navy blue, grey and white glitters of all sizes. It wants to go on top of ALL of your polishes and maybe even be sandwiched between them as well. You’re good to go with one to two coats, depending on how glitter-hungry you are!"

First, I tried one coat of Confusion with a K over Elevendy Seven - I thought it was a great combination!


The shimmers and flakies in Elevendy Seven went great with the tiny matte microglitters in Confusion with a K. It was a nice contrast that felt really fun and eye-catching to me! In my opinion, you really don't need more than 1 coat of Confusion. I let my bottle sit upside down for about 15 minutes before applying, and I had no trouble at all getting any of the different glitters out, even the big ones.


I experienced no problems with glitters clumping, bare spots, any curling - actually, application was a breeze, especially for such a packed and diverse glitter topper. A lot of times, those big hexes can be a pain, but not this time. :) Here's a shot with flash!


For something different, I tried one coat of Confusion with a K over Zetus Lapetus. Again, the shimmers and the matte glitter contrasted in a really cool way. I wasn't sure if this combination with work, but it ended up being a really cool look for summer, in my opinion! :)


Last shot, one with flash to really show off all the different colors of glitters!


Overall, I was hugely impressed with my first Emerald & Ash experience. All three formulas were on point; I had no issues with dragging, bald spots, clumping, anything. The colored shades were highly pigmented, but I personally experienced no staining.
Again, the Life in Color collection releases on July 10th at 9am MDT as a pre-sale. In the meantime, check out the other polishes they have in stock and the other 85 scents of cuticle oil to get an idea what you want to order when Life in Color releases!! Click the links below to see the E&A shop and their different social media sites to keep up to date on new colors and releases! :)
Emerald & Ash shop
Emerald & Ash Facebook
Emerald & Ash Instagram
Emerald & Ash Twitter

Thanks for reading!
<3 Kelly

These products were provided to me in exchange for my honest review and opinion. I am not being compensated for this post. Please see my Disclosure Statement for more information.