Sunday, January 31, 2016

Nail Challenge Collaborative: Purple #4 (Purple and Silver)

Hi everyone! I am squeaking in at the last minute, but I have my last Purple mani for January to share with you today. :)

I received these fun stickers to try from Lady Queen store, so I knew I wanted to incorporate them somehow.


I started with a base of Zoya Haven, and I used two of the decals to start off with. I liked how it looked so much, I didn't want to do much else, so I just added a touch of a silver glitter gradient using an unnamed silver glitter I got for Christmas. Even though this mani was super simple, I loved these colors together and felt like it came out really elegant!


I think Haven is such a gorgeous color all on its own, it really doesn't need much to dress it up. I am glad for the Purple theme this month giving me a chance to pull out all my purples that I had forgotten about! These stickers were super easy to use too. I used nail art tweezers to place them, then filed off the excess using an extra rough nail file. I didn't even topcoat over these and they stayed for a few days until I took off the mani. You can see my tip wear, I took the photos after wearing this mani for 3 days.


If you like these decals, check out the shop at LadyQueen.com to see what other great nail art items they have! I have another product to show you soon :)

Thanks for reading! Check back next month to see what I come up with for February's theme - Typography. :)

<3 Kelly


Monday, January 25, 2016

Nail Challenge Collaborative: Purple #3 (Leadlighting)

Hi everyone! I hope you had a great weekend. I got a lot done, but found some time for relaxing too. We didn't get any snow at all here in Dayton, but I might as well have been snowed in for how much I left the house haha.

Today, I want to show you my next mani for the NCC's Purple month! This time, I did some fun leadlighting nail art. After I had to get rid of all my Mentality glazes, I tried to find some other polishes in my stash that were sheer enough for leadlighting, and I have to say, this was kind of a fail. But, live and learn right? :)

I started with a base of Sinful Colors Snow Me White and stamped over it using my super squishy marshmallow stamper from Born Pretty Store, and my Konad Black. I totally forgot my liquid latex this time - oops!


I picked up these Sinful Colors "Opalescent" polishes last year or the year before. They are marketed as a sheerer polishes, so I was hoping these would work for leadlighting. They ended up being a touch too pigmented for this sort of nail art, but I still like it. I intended for the purple to be more of the focus, but the blue and green sort of pull your eye too, but I think it still works for the purple theme!


I used my dotting tool and Sinful Colors in: Flight to See, Prized Plume, and Sheer Flight to fill in the flowers. I didn't love the white popping through, so I grabbed another Sinful Colors in Flutter to lightly color those spots in.


I used HK Girl topcoat to seal it all in, but I felt the shininess made it even harder to see the black outlines peeking through, so I matted it using Butter London's matte topcoat.


Overall, I really liked how these nails came out! I am still on a hunt for a full collection of glazes that I can use for leadlighting. I found a few colors from Rica that work great, but I need MORE colors lol! :) Ever since I got all these new stamps that are so open and leave so much room for coloring in, I've been obsessed!

If you do decide to try out that super squishy stamper, or anything else on Born Pretty Store's website, feel free to use my code to get an additional 10% off your entire order. :)


Anyway, be sure to check out the rest of the ladies looks for Week 3!
Thanks for looking! <3
Kelly


Tuesday, January 19, 2016

Nail Challenge Collaborative: Purple #2 (Animals)

Hi everyone! I hope your week has started out all right. I'm already ready for the weekend lol :) Today I'm back with my next purple mani for the Nail Challenge Collaborative. Again, I used this one as a chance to try out my new Bundle Monster plates! 


I started with a base color of Trust Fund Beauty Elegantly Wasted, and did a little subtle gradient using Sinful Colors Purple Diamond.


I stamped over the gradient using Konad Black and BM-S164. Obviously, I didn't let it dry enough before I topcoated it! Argh! I was in a hurry. I used KB Shimmer Clearly On Top, which usually doesn't smudge my stamping, but this time it did. Oh well! I still really like how it turned out. :)


I love these plates so much! There are so many cute designs. I can't wait until I get my clear stamper in the mail so I can really play around more with placement. I have a hard time with those large designs, getting the image where I want it, so I'm so excited to try it with the clear stamper.

Thanks for looking! And check out the other bloggers' designs for Week 2!

<3
Kelly


Sunday, January 17, 2016

Nail Challenge Collaborative: Purple #1 (Cats!)

Hi everyone! I'm a bit late sharing my NCC manis with you this month! I have had most of them done, but just haven't gotten around to editing and posting. I wish I could tell you I had a good excuse, but really after Christmas I just have wanted to be so lazy! :D

This month's theme is purple, which really left it open to a lot of interpretation. I really wanted to try out my new Bundle Monster plates, so here is what I came up with for my first purple look!


I started with a base of Jindie Nails Purple Universary. I LOVE this polish, and I forgot how much I loved it. So happy to pull it out again for this challenge. :) It's a glorious purple jelly with all different sizes of circle glitters and tiny silver microglitters.


I sealed that in with a coat of HK Girl topcoat, then once that was dry, I stamped using Sinful Colors Snow Me White and BM-S161 and BM-S162. These plates are from the Fuzzy and Fericious collection, and I was so excited to try them out! I'm obviously a crazy cat lady, so this set was right up my alley. There are lots of other animals on there too, though. I thought they stamped great!


I did screw up the placement on my ring finger, so I tried to quickly swipe it off with a cotton swab and some acetone. I thought once I stamped over it, it wouldn't be noticeable, but oh well. I still really like how these came out! I even got a compliment from the Verizon guy when I was getting my new phone lol.

Be sure to check out the other ladies' looks for Week 1! And thanks for stopping by <3
Kelly


Wednesday, January 6, 2016

More late nail art! Christmas sweaters & NYE

Hey everyone! The other day I posted some belated Christmas ornaments. While on the subject of better late than never nail art, I decided to show you two more. I posted quick edits of both of these for the holidays, but I've got some better pics to show you today along with details about each look.

First up are the nails I wore for Christmas...and actually quite a while after because I liked them so much!


I started with base colors of Azature Red Diamond and Zoya Logan. Then I stamped using my new squishy stamper from Bundle Monster (I love it so much!) and Sinful Snow Me White. I also got some new plates from Bundle Monster, and for this look, I chose BM-S215. I used KB Shimmer Clearly On Top to seal it all in. It is quickly becoming one of my favorite topcoats!


Shortly after Christmas, I filed my nails down because it was getting hard to type at work! Then, I did this last minute New Year's Eve nail art. It isn't my favorite I've done, but I needed something for the holiday and I wanted to try another new plate! This one is BM-S212.


I wanted to kill two birds with one stone, and make this my final Negative Space mani for the NCC as well. So, I did a simple french tip using Zoya Trixie, and stamped using Sinful Black on Black. For the accent, I sponged on some more Trixie, Essie Butler Please, Zoya Sooki, and Zoya Logan. I intended to go with a fireworks look using BM-S211, but my nail ended up being too small lol, so you can only see the one swirl. Oh well! It was still a fun look.


After all that was done, it still was missing something. It was New Year's Eve after all, so I figured it needed some sparkle! I topped it off with China Glaze Fairy Dust because you can never go wrong with Fairy Dust. Again, I used KB Shimmer Clearly on Top.


And, here's a look at my thumb that showed just slightly more of the stamp!


I love doing holiday nail art, it makes me feel much more festive. Now that I'm all caught up, I guess I'm going to move on to Valentine's Day next!

I really enjoyed doing these looks, I hope you liked them too! Thanks for looking <3
Kelly


Saturday, January 2, 2016

Christmas Ornaments...a bit late!

I know, I know - it's after New Year's. Nobody wants to see Christmas ornaments lol. But I really loved how these turned out and I didn't get a chance to post them with all the craziness of the holidays going on. So, I'm posting them now! 

I used the reverse-stamping technique...I think...I'm losing touch with what all these things are called haha. I stamped onto a Ziploc bag I had painted clear top coat on and then I colored it in and peeled it off once it was dry. It was like a DIY decal. Whatever you call that technique! :)


I started with a base of Zoya Hunter on all the nails. I stamped onto the Ziploc using Konad Black and BM-H03. Then I filled in the ornaments using a bunch of polishes I can't remember off the top of my head lol. I know I used Shimmer Polish Berniece and Lindsey, some of the Julie G Gumdrops polishes, Jindie Nails Silent Night, Pahlish Cinnamon Twist. Actually I think that's all of them - go me! ;) Once I peeled off the decals and stuck them on, I sealed it all in with HK Girl.


Like I said, I do LOVE how these turned out. My only thing I would have done differently was to use a base that wasn't quite SO dark. It was hard to see the detail in the ornaments unless I had super bright lighting or the flash on. Which bothered me because these took forever to do lol! I wanted to use a Christmas tree green though, which is why I went with Hunter. I just think they would have popped a bit more on a lighter background. I still love them though! :)


I can't wait to try this technique with other designs. It made it really easy to do lots of different colors without having to wait for each one to dry on the stamper, which is how I've done this sort of thing in the past. I could work on all 5 designs at once right there on the Ziploc bag, and get done in a fraction of the time. :)


I'd love to hear your thoughts on this design! I hope you all had a safe and happy holiday! :)

<3 Kelly

Tuesday, December 15, 2015

Nail Challenge Collaborative: Negative Space #3

Hi everyone! I hope you're all having a great week so far. I can't complain with this warm weather! :]

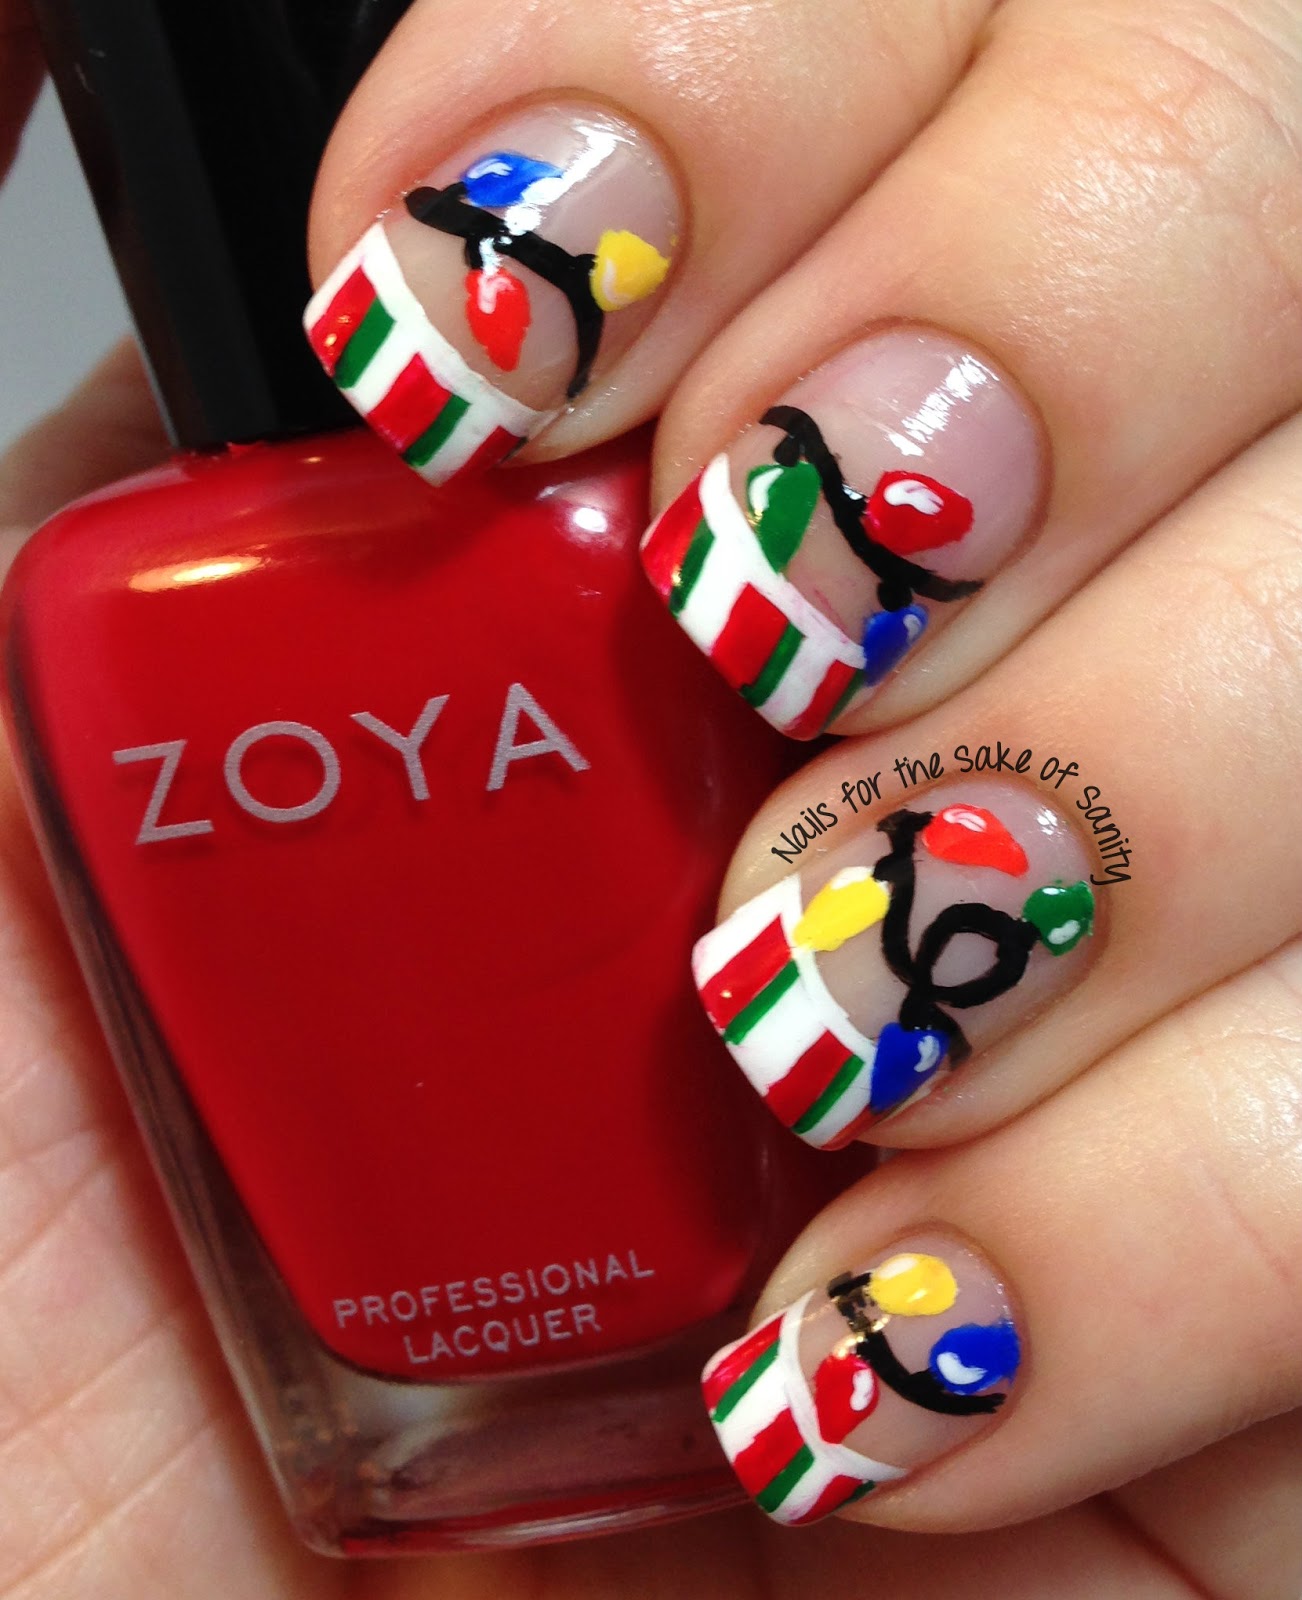
Today, I have my latest NCC mani to share with you. This month's theme is Negative Space, and I've had a lot of fun with it so far! For this look, I combined a couple of designs from Robin Moses.


I really love how these came out! Here is a list of the polishes I used:

  • Yellow Stopper base coat
  • Zoya Sooki
  • Sally Hansen Lightening
  • Sally Hansen Heat Flash
  • Sinful Colors Most Sinful
  • Stripe Rite White
  • Stripe Rite Black
  • Stripe Rite Green
  • HK Girl topcoat
I used striping brushes to do the string and the candy cane tips and dotting tools to make the bulbs. It was harder than I thought to make the bulbs because they had to be so small, but I still really like how it turned out. :)


I got a lot of compliments on these, and they are so festive for the holidays!! I think this is an easy enough design too, that anyone could attempt it, even a beginner. :) I didn't watch Robin Moses whole tutorial, but I'm sure it would be helpful! I just based this off two of her designs that I found on Google images. Here are the the images I used for inspiration: this Christmas lights design, and this design for the tips.


I had a great time with this nail art and I didn't want to take it off!! I have one more negative space design to show you next week. Thanks for looking, and be sure to have a look at the other ladies' looks! <3

Kelly


Thursday, December 10, 2015

Gingerbread Winter Scene for Nail Polish Canada

Hi loves! A while back, I was contacted by Nail Polish Canada and asked to join their holiday nail art challenge. I was so excited! And I worked really hard on this look - it took me like 2 hours lol. I wasn't sure exactly what I was going for, but I knew I wanted to do a winter scene. Here's what I came up with! :)


I started with a base of Sally Hansen Babe Blue on all nails. I'll just list here the polishes I used rather than going through what I used for each detail:

  • Stripe Rite in White
  • Stripe Rite in Black
  • Stripe Rite in Green
  • Zoya Sooki
  • Sinful Colors Black on Black
  • Sinful Colors Nirvana mixed with OPI First Date at the Golden Gate
  • Julie G Hot Cinnamon
  • Julie G Tangerine Dream
  • Julie G Rock Candy
  • Seche Vite
  • Butter London Matte Finish


That gingerbread house took me forever!! I couldn't get quite the right shade of brown, which is why I mixed my own. I used dotting tools and thin brushes to do the smaller details. I was a bit disappointed that the Seche Vite smeared my gingerbread house a bit, even though I let it dry forever!! I think it's probably time for a new bottle. I also just recently got KB Shimmer's Clearly on Top, which I've heard great things about. Maybe it will become my new go-to! :)


I was SO in love with how these came out! And I got a ton of compliments on them. People kept asking me if they were stickers. :) I went through and took macros of each nail to really show the detail. This is the gingerbread house before matte topcoat.


After matte topcoat:


Snowman, matted!


Gingerbread man, matted :)


And snowy Christmas tree, matted!


These nails really got me into the holiday spirit. I am super excited to work on some more holiday nails before Christmas gets here. 

I am really thankful to be a part of this Holiday Nail Art contest with Nail Polish Canada. I've seen some of the other artists' work, and they are killer!! You can join in and enter the contest yourself, by checking out the link below. Just click that you are interested in participating, and follow the instructions. The deadline is December 18th! I'd love to see what you guys come up with! <3

If you like my Gingerbread Winter Scene nail art, please vote for me at this link. I so appreciate your support!!

Thank you for reading, and Happy Holidays! <3
Kelly


Tuesday, December 8, 2015

Zoya Fall gradient

Hi everyone! Today is my birthday! :) I still have to go to work, so it's not too different from any other day unfortunately. Today, I'm sharing a fun mani I did this past fall with you. I had ordered some new Zoya shades during their early Earth Day promotion and I paired a few of them together for a seasonal gradient.


I started with a base of Channing, then used a makeup sponge to fade it into Blaze, and then Isa on the tips. I loved how this came out!! I used HK Girl to seal it all in. I wore this for over a week, on both hands! :)


I'm obsessed with gradients, I think they have such a cool look with minimal effort. And I really like these colors together. I think the bright pop of Isa on the tips adds a really cool effect. And the holo sparkles in Blaze really showed up well in direct sunlight or in flash, as shown below!


I didn't do any special birthday nails for today or anything, so I thought these were a fun alternative post to show you guys today. I can't wait to try gradients with some of the other new shades I got!

Thanks for looking! <3
Kelly

Monday, December 7, 2015

Nail Challenge Collaborative: Negative Space #2

Hi loves! Today I have my next Negative Space mani for the Nail Challenge Collaborative to show you. I wasn't sure what I was going for with this, I just kinda started painting and went with it. :)


I started with a base of Yellow Stopper and once that was dry, I freehanded the French tips on using Azature Lapis Diamond and just the brush it came with. They weren't perfect, but I knew I was going to stamp over it anyway. I wanted a geometric looking design, so I stamped using Konad Black and BM-322. And of course, my lovely squishy stamper from Born Pretty Store. I'm pretty much in love with it. I topped it off with Seche Vite. It was kind of interesting, the pair of the Yellow Stopper and the Seche Vite, or one or the other, really changed the color of the Azature polish. It made it look a lot darker. I was kind of disappointed by that, but I still like how it came out! :)


I've really been having fun playing around with negative space!! My naked nails don't look nearly as bad as I used to think. And I can't wait to see what everyone else comes up with. :)

Thanks for looking! <3
Kelly


Sunday, December 6, 2015

Swatch Spam!

Sometime last winter, I won a prize on Reddit from Kyoti of Lucky 13 Lacquer. I swatched all the polishes at the time and never got around to posting them!! So I'm doing that now. I have forgotten some of the names - I'm sorry. But the polishes are lovely and deserve to be shown off!!

First up is Starlight Polish - Blaze Crystal. It's a lovely copper holo! This is 2 coats, no topcoat. 


Next up is a pretty glitter topper from Sweet Heart Polish. I layered it over a dark green polish from Sinful Colors that I can't remember the name of. It was included in my prize! :)


This next polish is my favorite of the group! This is Lucky 13 Lacquer - Half the Sugar, Twice the Spice. It's a really pretty shade of purple that is unlike quite anything in my collection. There are little pink and copper glitters scattered throughout the polish. But not too many, just a smattering, which adds just a little something extra. I love it! This is 3 easy coats, with topcoat.


Next up is a glitter topper from Kawaii Nail Lacquer. I layered this one over the same dark green Sinful Colors polish. This topper is full of lots of little silver and gold squares and hexes, very festive for the holidays!


This last one is probably my second favorite of the bunch. This is Literary Lacquer - Lovely Intangibles. It has a super strong holographic silver base with little red, green, and silver glitters. This is 2 coats with topcoat. This is such a fun polish for the holidays!!


I was so, so thrilled to win this prize last year. It came at a perfect time for Christmas and I had so much fun trying out all these new brands. I'm glad I finally got around to sharing them all with you! :)

Thanks for looking! <3
Kelly

Wednesday, December 2, 2015

Nail Challenge Collaborative: Negative Space #1

Hi loves! I am so excited that my nails are healed up enough to jump back into nail art. I'm starting with my challenge group, the Nail Challenge Collaborative, and this month's theme is Negative Space!

I wouldn't typically do negative space manis because my nails have always been stained, but especially now, after all they have been through, they're not nice looking nails lol. The free edge is all misshapen from where they had been separated from the nail bed, I have a huge "onycholosis" bump in the middle of each nail, and another weird ridge a little higher up. So, when I saw negative space, I was like - crap. Then I thought- what the heck? I'm ready to get back into nail art fully, 100% so, this is me. These are my nails. And, I still like what I came up with!


I used Yellow Stopper base coat so you can't see quite how stained my nails are lol. Then, I used striping tape on the outside two nails with Sally Hansen Golden-I and Wet n Wild Black Creme. I used some decals from China Glaze for the two middle nails. I used a small pair of nail art scissors to snip off pieces of the decals to cover up most of the ugly parts while still showing negative space! :)


Nail decals never seem to work for me. They will stick initially, but even with 2 layers of topcoat sealing it in (I used Seche Vite this time), they don't stay on more than a day. The edges start to peel up. Any tips would be greatly appreciated on that! :) But, I loved how the striped nails came out. I wished I could have worn these longer but the decals started to drive me nuts.


Overall, I really liked this look! I love these colors together, and I liked the sharp angles of the geometric designs along side the stripes. And I thought the negative space looked really cool! I really haven't done much nail art incorporating negative space - actually, maybe none, I can't think of any, but this was fun. And, it got me really excited for the rest of the month - I'm already working on my next idea and I just keep thinking of more.

Thanks for looking, and be sure to check out what everyone else created!
<3 Kelly


Sunday, November 29, 2015

Review: Born Pretty Store Stampers, Plate and Polish!

Hi everyone!

A while back, I was contacted again by Daisy at Born Pretty Store to review some items. One of the things I chose was this awesome stamper set. I have been in the market for a new stamper for a while, and this set has a few different types to try, so I felt pretty sure one of them would work for me! :)


I also opted to try this Konad black stamping polish. I had never tried it before but I am always looking for a great black stamping polish!


Lastly, I picked out some stamping plates! I loved the packaging this large one came in. So pretty! When I picked these out, I was super into leadlighting and I liked this plate because it had lots of designs that I could color in. :)


I also fell in love with this smaller plate with several pretty floral designs, that I also thought would be great for leadlighting!


I decided to try to test/review all these products at once! I tried each stamper with one of the rose designs on the smaller stamping plate, using the Konad black. To keep all the conditions similar to see how each stamper stacks up, I just stamped the same stamp on a piece of paper to see how it worked.

Here's my stamping experiment! First up is the mint green stamper. This was the firmest of the bunch.


This one actually picked up surprisingly well, given how hard the stamp felt to me. I'm still no pro at stamping, so a lot of problems you may see here are probably user error. This stamper actually had one of the crispest transfers of the 3!


It looked even better once it transferred to paper! I was blown away!


Next up is the pink stamper. This was the middle of the road when it comes to squishiness. I have had stampers that feel similar to this before.


It picked up great! Super clean, crisp transfer. The lines are incredibly dark!


It didn't transfer quite as well as the green, but still - solid stamp. I really liked this one too!


And last, the one I was most excited to try - the humongous, oversized, super squishy marshmallow stamper! I had seen lots of posts about stampers like this and I was so excited to finally get my hands on one. I have a hard time "rolling" my stamps on with the firmer stampers,, and I have a pretty arched nail bed, so I felt like it would really help my nail designs to just be able to squish it straight down on my nail and have it cover even the creases of my nail along the cuticle. 


This one also has a little red side that could be used if you have just one small design to transfer.


It picks up really well! I forgot to get a shot of this one on the paper - oops!


I was initially really disappointed with how this one turned out. It seemed patchy, there were some blank spots and the lines weren't very dark or clean. 


But, it actually transferred better onto paper than it looked on the stamp! And, I got better with this stamper the more I used it too. Now it's the only stamper I use! I think I just had to get used to how to use a stamper that is SO squishy.


One small issue I do have with this marshmallow stamper is that it really picks up EVERYTHING. Before every stamping mani I do with it, I have to clean off tons of tiny little hairs or dirt particles it has picked up, but I have to be careful if I use a cotton ball, because the wispy little pieces get stuck to it. But that's such a small annoyance when compare to how easy it is to use. I love how you barely have to push to pick up an image, because it's so soft. Because of how little you have to push, you have less of a chance to smear or smudge the design. I love it.

Overall, this stamper set was a great experience for me to be able to see what I like in a stamper. Hands down, I would choose the soft white one, but both of the others are great too. It just depends on the shape of your nail or your stamping technique (rolling, straight down, etc) which one would work best for you. I like the set because you can try all 3, and see which one is the best fit for you. The set is a great deal at $6.99 USD, and you can grab it here.

The Konad black stamping polish is great! It's super pigmented and transfers really well. It's all I've been using for my stamping since I got it. This polish retails for $7.59 USD and you can see the listing here.

And, both plates I have tried are great. The images are etched deep enough that you get a nice clean image transfer every time. The larger one is a steal at just $1.99 USD, and you can see the listing here, and the small one - which can be found here - is just 99 cents!!

Don't forget - if you want to pick up any of these items or anything else from Born Pretty Store, you can use my discount code to receive 10% off your order!! 
And, shipping is always free!! Treat yo'self for Christmas, I won't tell! ;)


<3 Kelly